You put a jar or fermenter in a cold room, wait for the magic, and then… nothing much happens. Or worse, it creeps along for days, tastes off, and leaves you wondering whether the yeast or culture was the problem. Most of the time, the culture gets blamed. A chilly room is the real culprit.
For most people searching for the best heating pad for fermentation, the best buy is a waterproof seedling heat mat paired with a separate temperature controller. That setup works across more vessel sizes, more ferment types, and more room conditions than a one-piece pad or a simple wrap. But that stock answer is only half useful. Kombucha in a 1-gallon jar, a 5-gallon beer bucket, sourdough dough, and a crock of sauerkraut do not want the same heater, the same placement, or the same target temperature.
That is the tension here: you do not just need heat. You need the right kind of heat, in the right place, with enough control that you are not cooking the bottom of the vessel while the room still feels cold.
I have tested these setups the same way most home fermenters actually use them: in rooms that swing a bit overnight, on kitchen counters, on garage shelves, and on floors that quietly suck heat out of everything. The difference between a setup that “works” and one that works cleanly is usually not wattage. It is fit, probe placement, and whether the heat source is just adding warmth or actually being controlled.
- Which heater style fits kombucha, beer, mead, sourdough, and vegetable ferments
- When a controller stops being optional
- How to judge whether you need a gentle nudge or a real heat boost
- Which products are worth a look and who they suit best
- What usually goes wrong with fermentation heating pads
Best Suggestions Table (All products have been personally reviewed & tested by us! Click the buttons below to jump to the reviews.)
| Product | Best for | Action |
|---|---|---|
| VIVOSUN Seedling Heat Mat + Digital Thermostat Combo | Best overall for mixed fermentation use |
Check Price Review |
| Hemlock Home Brewing Kombucha Heating Wrap | Best for 1-gallon kombucha jars |
Check Price Review |
| BN-LINK Digital Temperature Controller | Best upgrade if you already own a heat mat |
Check Price Review |
Tip: Clicking the “Review” button will move you to the review so you can decide fast.
Start here
| If this sounds like you | Check this first | Best next step |
|---|---|---|
| 1-gallon kombucha jar in a cool kitchen | Do you only need a small temperature bump? | Use a wrap-style kombucha heating pad |
| 5-gallon beer, mead, or wine fermenter | How much colder is the room than your target? | Use a flat heat mat plus controller |
| Sourdough starter or dough proofing | Are you warming a jar or proofing a bowl? | Use a mat with careful probe testing |
| Cold garage, basement, or winter swings | Do temperatures rise and fall a lot? | Move to a controller plus insulation, or a chamber |
The short answer: the best heating pad depends on what you are fermenting
If you want one answer that works for most readers, buy a flat, waterproof seedling heat mat and pair it with a separate thermostat. That combo gives you flexibility. You can use it under a beer bucket, under a mead fermenter, under a crock, or next to a sourdough setup. It is not glamorous. It is just the most forgiving format.
For kombucha, the pick often changes. A dedicated wrap-style kombucha heating pad usually fits a 1-gallon jar better and warms the sides instead of pushing all the heat from the bottom. That matters because small jars react fast. They do not have enough mass to smooth out sloppy heating.
For a 5-gallon beer or wine fermenter, the flat mat plus controller still wins in most homes. There is more volume to warm, and the vessel footprint usually matches a mat better than a little wrap does. If you are fermenting in a room that is just a bit cool, this setup works nicely. If the room is much colder than the target, you will probably need insulation around the fermenter too.
Quick call: Want one setup for lots of ferments? Get a flat seedling mat and a controller. Want the easiest setup for a 1-gallon kombucha jar? Get a wrap. Want real precision for a big ferment in a cold room? Skip the “pad only” idea and build around control first.
That is why “best heating pad for fermentation” is a trickier question than it looks. You are not buying warmth in the abstract. You are buying a way to hold a live fermentation in a useful range without creating hot spots or false confidence.
Pick the heater style that matches your vessel, not just your budget

A lot of bad buys start with the product page. The listing says “fermentation” or “kombucha” or “seedling,” and that word becomes the whole decision. It should not.
The format changes how heat reaches the liquid, dough, or crock. And that changes how stable the setup feels over time.
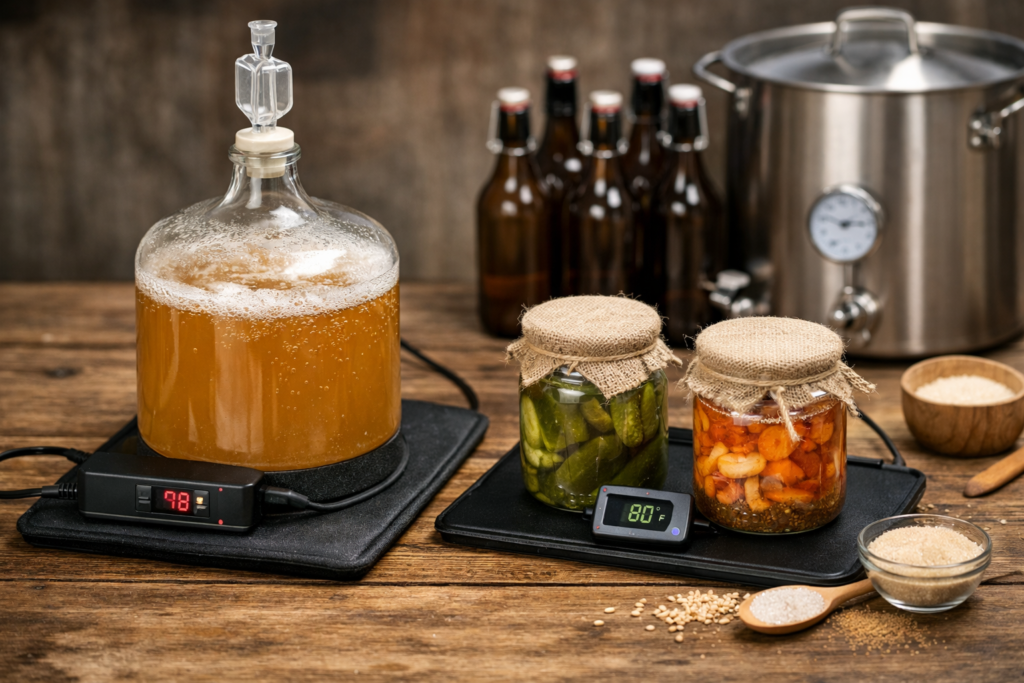
VIVOSUN Seedling Heat Mat + Digital Thermostat Combo
This is the easiest pick to recommend as the best overall fermentation heating pad for mixed use because it solves the two parts of the problem in one shot: it gives you a common flat heat source and includes actual control. VIVOSUN’s own heat mat documentation says the mat is built to warm the root area and can raise temperatures above ambient, while also noting that the mat itself is a constant heat source unless paired with a thermostat. That is exactly why the combo matters. The mat alone is not temperature control. The thermostat turns it into one.
In testing, this style of setup feels the least fussy with larger vessels. A 5-gallon fermentation bucket sitting on a flat pad behaves more predictably than a narrow belt wrapped around a section of the wall. The heat spreads into the vessel base and then into the liquid. Not perfect, but steadier. It also adapts well. One week it can sit under a bucket of cider. The next week it can help with a proofing setup for dough in a cooler kitchen.
Its weak point is the same one all under-vessel mats share: bottom heat is still bottom heat. If you run it too hot, or set the probe badly, the base can read warm before the bulk of the ferment catches up. The fix is simple. Use the thermostat probe at the vessel wall, insulate lightly if needed, and test with water before a live batch. For homebrewers, mead makers, or anyone juggling more than one ferment style, this is the one that usually leaves the fewest regrets.
Hemlock Home Brewing Kombucha Heating Wrap
The Hemlock wrap is a more specific tool. That is why it works. It is built around the shape and size of a standard kombucha vessel rather than trying to be a general mat for every use case. For a 1-gallon kombucha jar on a kitchen counter, that matters more than people expect. A side wrap gives gentler, more even warmth for a small vessel than a little heating pad shoved underneath.
Kombucha brewers usually care about one thing first: keeping the brew from dragging in cooler kitchens. Colorado State University notes that kombucha ferments within a broad warm range, with home brewers often preferring the low-to-mid 70s Fahrenheit for steady results. In that situation, a wrap can be a clean answer. You are not trying to slam a cold ferment into a hot range. You are nudging it.
Where this kind of product falls short is flexibility. It is tied to a narrow use case. It is not the pad I would buy first if I also brew beer, proof dough, or rotate vessel sizes. And if the room is very cold, a wrap without a separate controller can still become guesswork. For kombucha-only homes, though, the simplicity is hard to beat. You wrap it, set up your thermometer, and you are off. No weird improvising. No balancing a jar on a mat that is just a bit too large.
BN-LINK Digital Temperature Controller
This is not a heating pad. That is the point. If you already own a seedling mat, a reptile mat, or some other constant-on heat source, the BN-LINK controller is often the cheapest way to turn a blunt tool into a controlled fermentation setup. And for many readers, the controller is the real upgrade, not the pad itself.
That sounds unsexy, but it is what changes outcomes. A constant-on mat can be fine in a narrow band of room temperatures. Then the season shifts, the room warms a few degrees, and your “gentle” setup quietly overshoots. With a controller, the mat cycles on and off based on the probe reading. That means you can hold a cleaner working range. It also means the same mat can handle more than one task.
In actual home use, I like this route for readers who already have a decent seedling heat mat but know the setup feels a little too loose. Pairing that mat with a controller is usually a smarter move than tossing everything and buying a new branded “fermentation” heater. The tradeoff is that the controller only helps as much as your probe placement helps. Clip the probe in the wrong place, and you have just built a more precise way to read the wrong number. Still, as an upgrade step, this one punches above its weight.
Which style fits best?
| Style | Best for | Weak spot |
|---|---|---|
| Flat heat mat | Beer, mead, wine, crocks, mixed use | Can warm the bottom faster than the rest |
| Wrap-around heater | 1-gallon kombucha jars | Usually vessel-specific |
| Belt heater | Tall fermenters when bottom contact is awkward | Can create a warm band around one area |
| Controller only | Readers who already own a decent mat | Still needs a good heat source and smart probe placement |
If you ferment more than one thing, the flat mat plus controller is the safest first buy. It is the “buy one decent pair of boots instead of three flimsy pairs” option.
Use this simple rule to size the pad and controller correctly

You do not need a complicated formula. You need a room number and a target number.
Step 1. Measure your coolest normal room temperature and get a real baseline.
Step 2. Choose the target range for your ferment.
Step 3. Compare the gap.
If the gap is about 3 to 7 degrees Fahrenheit, a small wrap or standard seedling heat mat usually does the job. If the gap is about 8 to 15 degrees, a mat plus controller is the safer play, and light insulation around the vessel often helps. Once the gap stretches past that, a bare mat starts feeling like a patch rather than a real fix.
That is not a random guess. VIVOSUN’s published heat mat guidance says its mat can raise the root area temperature by roughly 10 to 20 degrees Fahrenheit above ambient, while also warning that actual performance shifts with surface, insulation, and setup. In fermentation, those variables matter even more because vessel mass and liquid volume slow the response down. A thin kombucha jar reacts faster than a full 5-gallon bucket. A fermenter on cold concrete loses heat faster than one on a shelf.
Fast rule: Small room gap, small heater is fine. Bigger room gap, use a controller and think about insulation. Big room swings, build a chamber instead of asking a mat to do a grown-up job.
The other sizing issue is footprint. A pad does not need to match the exact base size of the vessel, but it should support it cleanly. Tiny pad under a big vessel? Weak and uneven. Huge mat under a tiny jar? Not always bad, though it makes probe testing more important because the jar can warm faster than you expect.
And yes, controller quality matters more than people expect. A mediocre mat with a decent controller is often easier to live with than a fancy heater with no true temperature control.
Match the temperature range to the ferment so you do not solve the wrong problem
A heating pad is not “for fermentation” in one universal sense. It is for a specific fermentation. That distinction changes everything.
For kombucha, Colorado State University notes a typical fermentation range of 68 to 84 degrees Fahrenheit. In home kitchens, many brewers aim for the low-to-mid 70s because it keeps the process moving without pushing it too hard. A wrap-style kombucha heating pad makes sense here if your kitchen drifts cool. You are helping the culture, not forcing it.
Vegetable ferments ask for a calmer hand. University of Minnesota Extension recommends about 68 to 72 degrees Fahrenheit for sauerkraut and similar ferments, and notes that temperatures above 78 degrees can lead to soft texture and poorer quality. This is where people go wrong after reading a kombucha guide and trying to reuse the same warm setup for vegetables. Same broad hobby. Different target.
Wine shifts again. Oregon State University Extension lists roughly 60 to 70 degrees Fahrenheit for white wine micro-ferments and 70 to 80 degrees for reds. That split alone tells you why an all-purpose “set it warm” habit is sloppy.
Sourdough and dough proofing also live in a warmer zone than many liquid ferments. The Exploratorium’s yeast temperature guide explains that yeast growth speeds up as temperature rises into a warmer band, which is why proofing mats and warm spots work so well for dough. Bread logic does not transfer cleanly to beer, mead, or vegetable ferments.
And this is where a lot of readers quietly waste time. They buy a mat, hit a target they saw in a random thread, and never stop to ask whether that target was for the same ferment style.
If beer or cider is part of the mix, strain choice matters too. A warm-loving yeast and a cool-loving yeast can behave like two different species in the same room. That is one place where a solid yeast guide helps, because the heat setup only makes sense once the yeast range is clear.
Judge products by these 7 criteria before you trust one with a live batch
Forget the marketing words for a minute. “Fermentation mat,” “kombucha warmer,” “proofing mat.” Nice labels. They do not tell you much.
These seven checks do.
- Heating style: Bottom heat, side heat, or belt heat all behave differently. Bottom heat is flexible. Side heat fits jars better. Belt heat is the least forgiving.
- Controller quality: A clear display, a usable probe, and reliable cycling matter more than raw heat output in most homes.
- Useful temperature band: Not the number on the package. The range you can hold in your room with your vessel.
- Vessel fit: A mat suits many bases. A wrap suits fewer shapes. This sounds obvious, but it is where a lot of bad buys start.
- Water resistance: Fermentation areas get drips. A heating source that hates spills is a pain waiting to happen.
- Probe usability: Thick, awkward, or badly placed probes ruin otherwise good setups.
- Range across ferment types: If you brew kombucha today and mead next month, the flexible pick wins.
I also judge products by how annoying they are to live with. That is a real criterion, and it gets ignored. Does the cord sit where you need it? Does the controller feel readable at a glance? Does the pad shift when you move the vessel a little? Those details are not glamorous. They are the difference between a setup you keep using and one that ends up in a drawer.
What to check first
- If the heater has no controller, treat it as a heat source, not a control system.
- If the vessel is small, side heat is often easier to manage than bottom heat.
- If the room runs cold and swings a lot, pad shape matters less than control and insulation.
- If the product only fits one jar size, buy it only if that is really your long-term setup.
That is why the flat mat plus thermostat stays such a strong recommendation. It is not exciting, but it clears more of these seven checks than most narrow-purpose products do.
Set it up like this and test it before your fermentation depends on it

A setup can look sensible and still read wrong for eight hours straight.
So test it dry first.
Step 1. Place the heater on the right surface and stop heat loss early
A pad sitting on a cold concrete floor has to fight the floor before it warms the fermenter. Put the mat on a shelf, wood board, or another less heat-hungry surface if you can. This one small change often steadies the system more than people expect.
Step 2. Position the vessel so heat spreads cleanly
Center the vessel on the mat. With wraps, keep the band level and snug, not twisted or half-slipping down the jar. If you use light insulation around the vessel, do not smother the heater itself unless the manufacturer says that is okay. VIVOSUN’s manual warns against wrapping the mat directly and against submerging it in water. That kind of boring line in the manual matters more than a glossy product image ever will.
Step 3. Place the probe where it reflects the ferment, not the hottest spot
If the probe sits right on the mat, you will read the heater. If it hangs in open air, you will read the room. For most vessels, tape the probe to the side wall near the liquid line and cover it lightly with insulation so it reads something closer to vessel temperature. Is it perfect? No. Is it a lot better than reading open air? Yep.
Step 4. Run a water test and catch overshoot before it matters
Fill the vessel with water and run the setup for 8 to 12 hours. Check the probe reading and compare it with a second thermometer if you have one. Watch how often the controller cycles. Watch what happens at night. If it overshoots with water, it will not magically behave better with a live batch.
Note: This is where many “bad product” stories get sorted out. The product often is not bad. The probe was reading the wrong thing, or the vessel was losing heat through the shelf or floor.
If mead is part of the plan, a clean mead process guide pairs well with this step because gentle, stable temperature helps fermentation quality just as much as recipe choices do.
Avoid the 6 mistakes that make heating pads look worse than they are
1. Using a regular pain-relief heating pad.
This one trips up beginners all the time. A household heating pad often has auto shutoff timers, soft fabric layers, and a design built for bodies, not for jars, crocks, or damp utility areas. It is the wrong tool.
2. Plugging a constant-on mat straight into the wall and calling it temperature control.
A mat without a controller is just a source of heat. That may be enough in a narrow situation. It is not the same thing as holding a fermentation range.
3. Heating cold glass too hard.
Glass is not fragile in a cartoonish way, but sharp temperature differences are a lousy idea. A small, steady bump is safer and easier to manage than trying to “catch up” a cold carboy fast.
4. Measuring the wrong number.
Probe on the mat? Wrong number. Probe hanging free in room air? Wrong number again. Bad readings create fake confidence, and fake confidence is where off-flavors and stalled batches creep in.
5. Asking a tiny pad to fix a huge room problem.
If the room is way below target, the mat is not the hero. The room is the problem. Add insulation or move to a chamber.
6. Reusing the same target temperature for every ferment.
Kombucha, sauerkraut, dough, beer, and wine all have their own lane. A setup that speeds one ferment nicely can push another into poor texture, odd flavor, or messy timing.
The useful thing about this list is that each mistake has a clean fix. Use the right heater type. Add a controller. Place the probe smarter. Test with water. Match the range to the ferment. That is not fancy advice. It just works.
Know when a heating pad is enough, and when you need a better system

A heating pad is enough when the room is only a bit cool, the ferment is not wildly temperature-sensitive, and the setup stays fairly stable across day and night. In that lane, a seedling heat mat for fermentation works well. So does a kombucha wrap for smaller jars.
A heating pad stops being enough when the room swings hard, when the vessel is large, or when the ferment really wants a tight range. Homebrewers hit this wall all the time. A pad can keep a bucket from getting too cold. It cannot do much about a room that bounces around all day and night.
That is where the upgrade ladder helps.
- Pad only: Fine for tiny temperature bumps in steady rooms.
- Pad plus controller: Best first serious setup for most readers.
- Pad plus controller plus insulation: Good for cooler rooms and larger vessels.
- Fermentation chamber with heating and cooling: Best when precision matters or the room swings a lot.
Still in doubt? Here’s a fast guideline to save you some time.
Buy a wrap if you only brew kombucha in 1-gallon jars.
Buy a flat mat and controller if you ferment several things or use bigger vessels.
Build a chamber if the room temperature behaves like a moody teenager.
That last step sounds like overkill until you need it. Then it feels obvious. If the room is cold in winter and hot in summer, a controller paired to a heat mat only solves half the year.
The best heating pad for fermentation is the one that fits the job and knows its limits. Sometimes that is a clever little wrap. Sometimes it is a flat mat with a thermostat. Sometimes, honestly, it is no pad at all because the better answer is a chamber.
FAQ
Can you use a regular electric heating pad for fermentation?
It is a poor choice. Regular heating pads are built for body use, often shut off on a timer, and are not meant for jars, buckets, or damp fermentation areas. A seedling mat, kombucha wrap, or brewing heat source is a better fit.
Is a heating pad or a wrap better for kombucha?
For a standard 1-gallon kombucha jar, a wrap is usually easier to manage because it matches the vessel shape and warms the sides. A flat mat is still fine if you already own one and use a controller, but it is a more general tool than a kombucha-specific one.
Where should the temperature probe go on a fermenter?
For most setups, tape the probe to the vessel wall near the liquid line and cover it lightly with insulation. That gets you closer to ferment temperature than reading room air or the heater surface.
