The first time a keg goes sideways, it usually happens in about five seconds. The coupler locks in, the CO2 is on, the faucet opens, and the glass fills with foam like shaving cream. Then the guessing starts. More pressure? Less pressure? Bad keg? Bad luck?
If you’re here to learn how to tap a keg with co2, the short answer is this: chill the keg all the way down, confirm the coupler matches the keg, connect the gas line and regulator, set a sane starting pressure for the beer temperature, seat the coupler with the handle up, turn it to lock, push the handle down, then pour one test glass and change only one thing at a time. Most bad pours are not random. They come from warm beer, the wrong coupler, partial faucet opening, or a draft system that is out of balance. Cicerone’s Certified Beer Server syllabus says kegs should be chilled to draft-system temperature before serving and shows the basic coupler motion: handle up, quarter-turn to lock, then handle down to engage.
That stock answer is close. It is also too thin to save a warm keg or a mismatched setup. A regulator number by itself does not tell you much. A keg at 38°F holding 2.5 volumes of carbon dioxide needs about 11 psi to maintain carbonation, but the right gauge setting shifts with beer temperature, beer style, altitude, and the resistance built into your beer line and faucet.
What this guide will help you fix fast
- the right order for tapping a keg with a CO2 tank and regulator
- what pressure to start with before you start twisting knobs
- how to tell “warm keg foam” from “draft system foam”
- what to check when nothing pours or the pour is weak
- when a standard kegerator setup and a party setup need different moves
| If this happens | Check this first | Do not do this yet |
|---|---|---|
| First pour is mostly foam | Beer temp and tower warmth | Slash the PSI right away |
| Every pour is foam | Keg temp, line balance, faucet fully open | Assume the keg is bad |
| Nothing comes out | Coupler fit, gas path, tank valve | Force the coupler |
| Beer tastes flat | Too little pressure or air exposure | Keep serving on a party pump |
Tap the keg in the right order so the first pour is drinkable

The regulator gets blamed for everything. Half the time it is innocent.
The order matters more than most beginner guides admit. Start with the keg cold. Put the coupler handle in the up, or off, position. Seat the coupler on the keg valve. Turn it about a quarter turn to lock. Set the regulator to a sane starting pressure. Open the gas side. Push the coupler handle down to engage. Then pour a test glass with the faucet opened all the way. Cicerone lays out the coupler motion and also warns against partial faucet opening because partially opened faucets pour foamy beer.
That last part is easy to miss. If the faucet is cracked halfway because you’re trying to “go gentle,” you can create foam with a perfectly fine keg. I have watched people chase that fake problem for twenty minutes while the real fix was just pulling the handle all the way forward.
Remember: A good test pour is not a timid pour. Open the faucet fully. A partially opened faucet adds turbulence and that turns clean beer into foam.
If the keg travelled warm in a car trunk, sat in the sun, or got rolled around at a party, slow down. The right move is not “adjust until it works.” The right move is “get the beer cold and settled, then test.” That sounds boring. It also saves a lot of beer.
Chill the keg and set a sane starting pressure so you do not chase phantom foam
A pressure number without beer temperature is like being told to buy “medium shoes.” It sounds useful until you try it.
The Brewers Association’s Draught Beer Quality Manual gives the cleanest anchor point here: beer in a keg at 38°F needs about 11 psi to maintain 2.5 volumes of carbon dioxide. The same manual also shows what happens when temperature drifts. Keep pressure at 11 psi and raise the beer to 42°F, and carbonation drops from 2.5 to 2.3 volumes over time. Raise pressure to 13 psi at 38°F, and the beer absorbs more gas. That is why “just set it to 10” works for one keg and turns the next one weird.
For many home kegerators pouring a standard ale or lager at about 38°F, starting around 12 to 14 psi is a sensible first move. That range lines up with common field guidance, but it is still a starting point, not a law. If the beer is more highly carbonated, if you live at elevation, or if the line setup is odd, the number shifts. The Brewers Association notes that pressure gauges read about 1 psi low for every 2,000 feet of elevation, so a mountain-town setup can need more gauge pressure than the same keg at sea level.
The bigger trap is temperature. The Brewers Association shows that a keg that “feels cold” at 44°F can still need about 18 hours to get back to 38°F. A keg starting at 50°F can need around 25 hours. That one table explains a ton of bad pours. People tap too soon, the beer foams, then they start wrenching the regulator around when the keg simply is not ready yet.
Quick starting rule
- Beer not fully cold yet: wait before diagnosing
- Standard ale or lager around 38°F: start near 12 to 14 psi
- Higher elevation: add gauge pressure, not panic
- Highly carbonated beer: expect a higher pressure target
If first-pour foam shows up right after a warm delivery, don’t do anything clever. Get the keg cold. Come back tomorrow. That is not glamorous advice, but it’s dead-on.
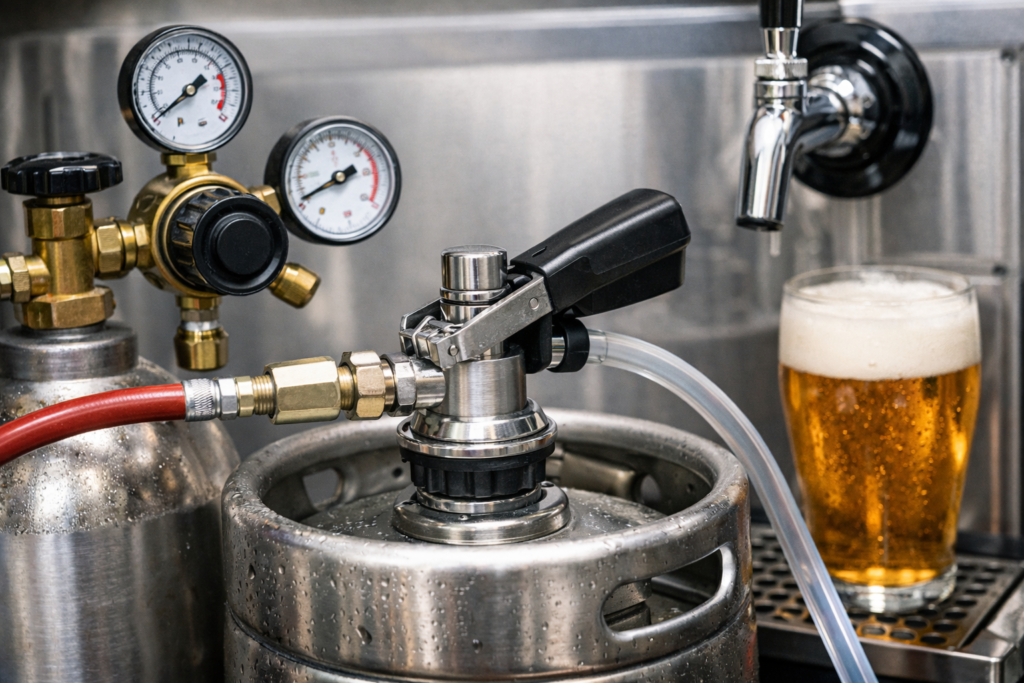
Match the coupler and gas path so the keg can actually pressurize

Your gas path is simple: CO2 tank to regulator, regulator to gas line, gas line to coupler, coupler to keg. If any part of that chain is wrong, pressure never reaches the beer the way you think it does.
The coupler part trips people up because commercial kegs do not all use the same keg coupler. Cicerone lists several common coupler systems used in keg changes, including D-, G-, S-, and U-system couplers, which is enough to make the point: “looks close” is not the same as “fits.”
If nothing pours, or gas seems on but the keg acts dead, check these in order:
- the tank valve is open
- the regulator is actually set above zero
- the gas line is attached to the gas side of the coupler
- the coupler is the right system for the keg
- the coupler is locked and engaged, not just sitting there looking hopeful
I’ve seen the gas line clipped to the wrong fitting more than once. It feels dumb after the fact, but when parts are new and the party has already started, dumb stuff happens fast.
Note: If the coupler does not seat cleanly, stop. Do not force it. The right coupler locks with a clear quarter turn and then engages with the handle. A stubborn fit is not a challenge. It is a warning.
That is also the point where a seller, brewery taproom, or distributor can save you a headache. A thirty-second confirmation beats a stripped fitting and a room full of foam.
Connect the regulator, seat the coupler, and engage the keg without blowback

Set the regulator so the gas side is ready
Before the keg is engaged, back the regulator out if needed, open the tank, and dial in the starting pressure. That gives you a controlled gas source before beer starts moving. The exact order can vary a little by setup, but the goal is the same: gas should be ready, the faucet should be closed, and the coupler should go on with the handle up. Field guides from commercial draft suppliers describe the same basic sequence.
Seat the coupler so it locks cleanly
Place the coupler on the keg valve and turn it about 90 degrees to lock. Then push the handle down to the on position. Cicerone uses that exact quarter-turn-to-lock, handle-down-to-engage sequence for common commercial coupler types.
Pour the first test glass so the system tells the truth
Open the faucet fully and watch what kind of problem shows up. A little burst of foam in the first ounces is not the same thing as a full pint that looks like whipped soap. That distinction matters because the fixes are different.
One more wrinkle. A standard direct-draw kegerator and a temporary rod-and-faucet setup do not behave the same way. Short event setups are often run at much lower applied pressure and sometimes vent initial foam before the gas side is opened. KegWorks’ rod-and-faucet instructions, for example, call for about 3 to 4 psi after initial bleed-off. That is not a model for long-term home kegerator service. It is a workaround for a different kind of setup.
So when two articles seem to contradict each other, they often are talking about two different draft systems. That’s the sneaky bit.
Read the first pour like a diagnostic test, not a verdict
The first glass is a clue. Treat it like one.
| Symptom | Most likely first check | What it usually means |
|---|---|---|
| First pour foamy, next pour fine | Warm tower or faucet | Beer in the tower warmed up between pours |
| Every pour foamy | Beer temp and line balance | The whole system is off, not just the first ounce |
| No beer at all | Coupler, gas path, tank valve | The keg is not actually pressurized or opened |
| Weak, sluggish pour | Low applied pressure or restriction | The beer is fighting the system the whole way |
| Flat beer | Too little pressure or air exposure | Carbonation is escaping faster than it is being held |
The Brewers Association gives a useful sanity check for flow. A balanced draught system pours clear beer at about 2 fluid ounces per second, which works out to roughly 8 seconds for a pint. If the pour is racing way past that, or crawling far below it, the system is telling you something.
Here is the simple if/then version:
- If only the first pour is foamy, check the tower or faucet warmth before touching pressure.
- If every pour is foamy, check keg temperature before lowering pressure.
- If nothing pours, stop thinking about foam and start checking coupler fit and gas flow.
- If the beer is flat, look for too little pressure, leaks, or service on air instead of CO2.
Change one thing. Test again. Then change the next thing if you still need to. The fastest way to get lost is to move pressure, line, and coupler position all at once.
Balance pressure, line resistance, and tower warmth so the fix actually sticks
This is where a lot of guides get fuzzy. The regulator does not “control foam” by magic. It supplies pressure. Your beer line, height change, shank, and faucet create resistance. When pressure and resistance are close to each other, the pour behaves. When they are not, the faucet tattles on you.
The Brewers Association explains this cleanly. Pressure pushes beer from keg to faucet. The beer line and changes in height push back. To get proper flow and beer quality, the pressure applied to the keg has to match the total resistance of the system. The same manual says many direct-draw kegerators with short runs use 4 to 5 feet of 3/16-inch inside-diameter vinyl tubing, and that a balanced system should pour around 1 gallon per minute, or about 2 ounces per second.
That gives you a better decision rule than “turn it down until it stops foaming.”
If the beer is warm, lowering pressure can make the pour look better for a moment while the keg slowly loses carbonation. If the pressure is too low for the beer’s carbonation level, carbon dioxide breaks out in the line and glass. Then you get foam now and flatter beer later. The Brewers Association shows that exact relationship in its carbonation table.
If your first pour is ugly and the second is fine, tower warmth is a prime suspect. The beer sitting in the tower or faucet warms up between pours. That warmer slug of beer hits the glass first and breaks out CO2 fast. Once cold beer from the keg reaches the faucet, the pour settles down. That is a very different problem from a keg that is warm through and through.
Two fixes that get mixed up all the time
- Warm tower: first pour foams, later pour improves
- Warm keg or bad balance: every pour keeps misbehaving
For a deeper walkthrough on line balance, tower assembly, and leak checks, this kegerator setup guide fits right here.
Choose the right CO2 setup for the job instead of copying one-size-fits-all advice

Not every keg setup is trying to do the same thing. That is why copied advice gets messy.
A home kegerator or other direct-draw system is built for steady storage, stable carbonation, and repeated pours. A rod-and-faucet picnic setup is built for a short event. A jockey box chills beer on the way to the faucet. A party pump uses plain air instead of carbon dioxide, which is why it is fine for a one-day blast and lousy for keeping beer fresh. The setup decides the playbook.
For a standard direct-draw home system, the usual goal is to hold the brewery’s carbonation and pour cleanly. That is where short beer lines, fully chilled kegs, and a sane pressure setting matter. For a temporary event kit, you may bleed initial pressure and run much lower applied pressure. For a party pump, freshness falls off fast because oxygen exposure starts the clock. That is why CO2 service is the better move when the keg is meant to last more than a quick party.
Two edge cases are worth calling out. Highly carbonated beers can want more pressure than a standard lager or pale ale. Nitro or stout systems are a different animal again because the gas blend and faucet design change the whole pour. If a brewery or the keg collar gives service guidance, use that. It beats generic internet lore every time.
And if the plan is a fridge conversion instead of a factory kegerator, this build-a-kegerator walkthrough covers the fit, tower, and draft-balance pieces that affect pouring later.
Keep the keg safe, fresh, and easy to untap after the last pour
CO2 is clean for beer. It still deserves respect around the tank.
OSHA’s cylinder guidance says compressed gas cylinders should be kept secured upright and protected from being knocked over while in use. The same OSHA interpretation says indoor storage should be well ventilated and not shoved into unventilated cupboards or lockers.
OSHA’s carbon dioxide hazard bulletin adds the other reason to take this seriously: carbon dioxide can displace oxygen, it is denser than air, and high concentrations can collect in below-grade or poorly ventilated spaces. That is not a reason to be dramatic about a home kegerator. It is a reason to keep the cylinder upright, keep fittings tight, and not hide the tank in some weird sealed nook.
Important: Upright, secured, ventilated. That is the whole tank-safety speech for most home setups. Simple is good here.
When it is time to untap, shut off the gas, lift the coupler handle to disengage, rotate the coupler to unlock, and lift it off. That quarter-turn unlock step is the reverse of the engagement sequence in the Cicerone guide.
Freshness is the easy part. A keg served on CO2 holds up much better than one served on a party pump because you are not feeding it room air every time you pour. Temperature and line hygiene still matter, of course. A clean system and cold beer keep flavor where it belongs.
If the keg in question is homebrew in a Cornelius keg instead of a commercial Sankey keg, this homebrew kegging guide gets into purging, carbonation, and the small line-balance tweaks that matter more with DIY gear.
FAQ
Should the CO2 tank stay on between pours?
For a normal home kegerator, yes. The gas stays on so the keg holds the pressure needed to keep carbonation steady. Shutting the tank off between pours usually creates more confusion than benefit unless you are diagnosing a leak or tearing the system down.
Can the same tapping steps be used for a commercial keg and a homebrew Cornelius keg?
The gas logic is similar but the hardware is not. Commercial Sankey kegs use a keg coupler. Cornelius kegs use ball-lock or pin-lock disconnects. The same ideas still apply though: cold beer first, correct gas pressure, fully open faucet, and a beer line with enough resistance to match the setup.
:
