You can brew honey mead at home with four core moves: keep everything clean, mix honey and water into a must, pitch a suitable yeast with proper nutrient, then wait for stable hydrometer readings before you rack or bottle. That is the plain answer.
The trouble is that “just mix honey, water, and yeast” leaves out the part that decides whether your mead turns out crisp and drinkable or hot, stuck, and weirdly thin. Honey is not grape juice. It ferments well, but it does not hand yeast the same buffet of nutrients. That one difference trips up a lot of first batches.
I’ve seen this go sideways in the most ordinary way possible. The airlock starts chugging, the room smells amazing, and you think, “Nice, I’ve got this.” Then three weeks later the mead tastes sharp, the sweetness is wrong, and you have no idea whether it needs time, sugar, or a full rescue. The batch did not fail because mead is hard. It failed because nobody explained the decision points.
This guide fixes that. You will see the simple method first, then the forks in the road that change the result.
- How to make a first batch that has a strong chance of tasting good
- How much honey to use for dry, semi-sweet, or richer mead
- Why yeast nutrient and temperature matter more than most beginner recipes admit
- How to tell whether fermentation is actually done
- When to rack, when to leave it alone, and when aging helps
- How to fix the usual beginner problems without making the batch worse
Start Here
| If this sounds like you | Do this | Skip this for now |
|---|---|---|
| “I want my first mead to work.” | Make a 1-gallon traditional still mead with about 2.5 to 3 pounds of honey, wine yeast, nutrient, and hydrometer readings. | Fruit, spices, carbonation, and trying to stop fermentation mid-stream. |
| “I want sweeter mead.” | Let it ferment cleanly first, then stabilize and backsweeten. | Guessing sweetness from honey weight alone. |
| “My mead stopped bubbling.” | Check gravity. Then check it again after a short interval. | Bottling by calendar or airlock activity. |
| “I only want one upgrade.” | Buy a hydrometer and use nutrient on schedule. | Fancy honey and extra gadgets. |
How to brew honey mead in the simplest way that still tastes good
If you want the short version of how to brew honey mead, here it is: sanitize your gear, dissolve honey into water, pitch a wine or mead yeast, add yeast nutrient on schedule, keep the fermenter in a sane temperature range, confirm the finish with a hydrometer, then age and bottle when the numbers say it’s ready.
That method works because it handles the two things that make mead tricky for beginners: sanitation and yeast health. A review of mead fermentation research lays out the same core issue in less homebrew-ish language: honey must is poor in nutrients for yeast compared with grape must, so fermentation can lag or finish badly if you treat it like a dump-and-wait drink.
So the easiest first batch is not the flashiest one. It is a simple traditional mead. No berries. No cinnamon sticks. No “I’ll just wing the sweetness.” Just honey, water, yeast, nutrient, time, and notes.
Note: A first batch should teach you what the base drink tastes like. Fruit and spices can hide problems, but they also hide the lesson.
If you keep the first run plain, every later batch gets easier. You will know what orange blossom honey does. You will notice what a warmer room does. You will spot the difference between “young and rough” and “actually flawed.”
Pick your batch style first so the rest of the process stops being confusing
A lot of beginner mead confusion starts before the yeast packet is even opened. You don’t yet know what kind of finish you want, so every later choice gets fuzzy.
Start with the result in the glass.
Traditional still mead is the best first route for most people. It shows you the honey, the yeast profile, and every process mistake without extra noise. If you want a mead that teaches you something, brew this first.
Fruit or spiced mead sounds more forgiving, and sometimes it is more fun, but it adds sugar, acid, tannin, pectin, and timing questions. Great second or third batch. Not ideal for batch one.
Session mead or hydromel is lighter and quicker. It can be lovely, but low-gravity mead has less body to hide rough fermentation. People assume “lower alcohol = easier.” Not always.
Now decide sweetness. That one choice narrows the process fast.
| Goal | Honey per gallon | What that usually means |
|---|---|---|
| Lighter / drier | About 2 to 2.5 pounds | Cleaner, leaner, less residual sweetness if fermentation finishes strong |
| Balanced / fuller | About 2.5 to 3 pounds | A good first-batch zone for traditional mead |
| Richer / sweeter potential | About 2.75 to 3.5 pounds | Only sweeter if the yeast leaves sugar behind or you backsweeten later |
That last line matters. More honey does not automatically give you sweet mead. A strong yeast can chew through a lot of sugar and leave you with a dry mead that also happens to be stronger. If your real target is semi-sweet or sweet, the safest beginner path is to ferment cleanly first, then stabilize and backsweeten to taste.
What to check first: If you want your first batch to taste “good” rather than “interesting,” pick a 1-gallon traditional still mead and aim for the middle ground on honey weight.
Choose honey, yeast, and water that give you a clean first fermentation

The ingredient list is short, so each choice shows up loudly in the finished mead.
Honey first. Use a honey you actually enjoy eating. Wildflower and orange blossom are friendly beginner choices because they bring character without turning the batch into a guessing game. Very dark or strongly medicinal honeys can make a fascinating mead later on. For a first run, they can feel like driving in fog.
I like the “toast test.” Put a little of the honey on plain bread. If it tastes flat, harsh, or oddly muddy there, fermentation is not likely to redeem it. Mead can refine flavor, but it is not wizardry.
Yeast next. Use a wine or mead yeast, not bread yeast. Bread yeast can ferment, sure, but it is not built for the flavor profile and alcohol environment most mead makers want. A wine yeast gives you a cleaner lane: better alcohol handling, a more predictable finish, and fewer ugly surprises.
Think in outcomes:
- If you want cleaner and drier, choose a yeast with a solid track record in wine-style fermentation.
- If you want a softer aromatic profile, choose a strain known for that behavior.
- If you want a stronger mead, choose a strain that can handle the gravity you are creating.
Then water. Good-tasting water makes good mead. If the tap water tastes heavily chlorinated, use filtered water. You do not need mystical spring water from a mountain with a story attached. You just need water that does not taste bad.
One more small thing that saves hassle: buy enough of the same honey for the batch and a little extra. If the mead finishes too dry and you decide to backsweeten later, matching the honey keeps the flavor more coherent.
Pro tip: The first batch is a place to be boring on purpose. “Pleasant and predictable” beats “rare and dramatic” every single time.
Sanitize your equipment and build the must without cooking the life out of the honey

Cleaning and sanitizing are not the same job. Penn State Extension explains this clearly in its review of winery sanitation: soil and residue have to be removed first, or the sanitizer is working on top of grime instead of on the surface you care about. That sounds small. In fermenting, it isn’t. Clean first, then sanitize.
Here is the simple build sequence.
Step 1. Clean the gear so sanitizer can work.
Wash the fermenter, airlock, spoon, funnel, hydrometer jar, siphon, and anything else that will touch the must.
Step 2. Sanitize the contact surfaces so stray microbes stay out.
Follow the sanitizer directions. Don’t freestyle the contact time. Don’t rinse unless the product says to.
Step 3. Mix the honey and water so the must is uniform.
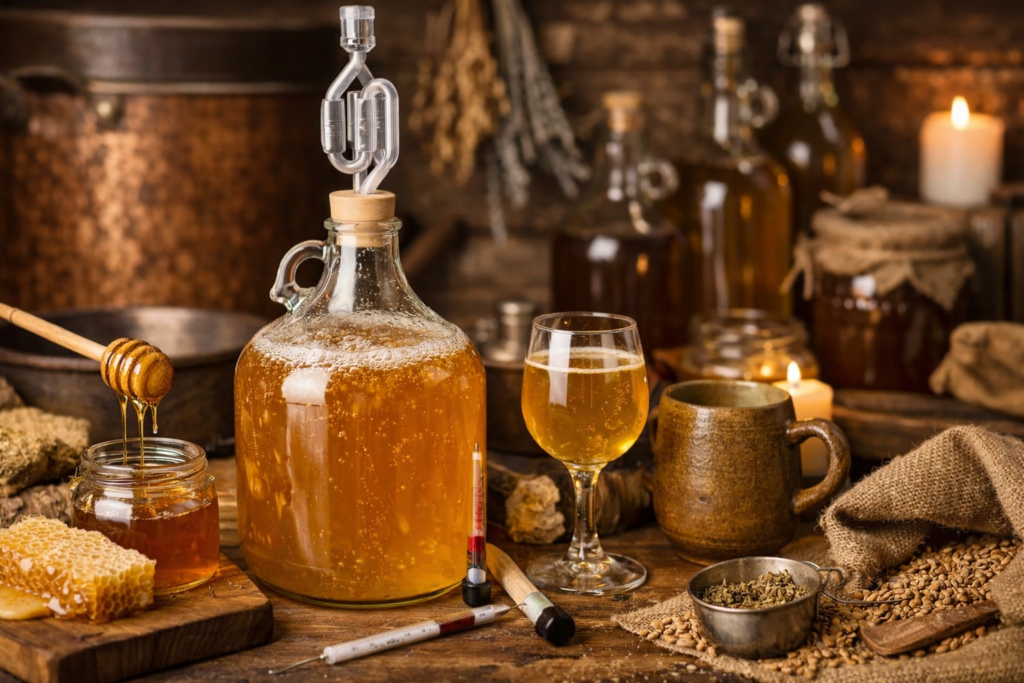
For a 1-gallon traditional mead, about 2.5 to 3 pounds of honey plus water to volume is a very workable starting point. Stir until the honey is fully dissolved.
Step 4. Pitch the yeast when the must is in a yeast-safe temperature zone.
Check the yeast packet. If the must is too warm, wait. Killing the yeast on day one is a grim way to save three minutes.
The boiling question comes up every single time. Most modern home mead makers do not boil the honey. Some gently warm the container or use warm water so thick honey pours and dissolves more easily. That is different from simmering the life out of it. If the point of buying expressive honey is aroma, aggressive heat is not helping you.
A no-heat or low-heat start also keeps the process simpler. Fewer steps. Less waiting for cooling. Less chance of pitching too warm because you got impatient.
Important: Bottles and live fermentation are a dangerous pair. Do not bottle based on “it looks calm now.” Bottle based on stable gravity readings.
If you want a deeper look at basic fermentation setup before starting, a short gear primer like this home brewing systems guide can help sort the starter equipment without turning the batch into a shopping project.
Pitch healthy yeast and feed fermentation so your mead does not turn hot, sluggish, or stuck
This is the section most short mead recipes barely touch, and it is the section that changes the result the most.
The research is not vague here. Mead must is low in yeast-assimilable nitrogen, which is one reason fermentations can drag, stall, or throw rough alcohol notes when the yeast is stressed. That same mead fermentation review goes into the chemistry. At the kitchen-table level, the lesson is simple: feed the yeast like you mean it.
Step 1. Rehydrate or pitch the yeast the way the maker tells you.
Some strains perform better when rehydrated properly. Some instructions are more direct. Follow the packet. This is one place where recipe improvising is a bad hobby.
Step 2. Aerate early so the yeast gets moving.
At the start, oxygen helps yeast build healthy cell walls and get the fermentation rolling. Stirring or shaking early can help.
Step 3. Add nutrient on schedule so the fermentation stays clean.
A staggered nutrient addition is a smart beginner upgrade. Instead of tossing all the nutrient in one shot, you spread it over the early phase of fermentation. That gives the yeast support while it is active instead of dumping everything in at once and hoping for the best.
Step 4. Keep temperature steady so the flavor stays sane.
A cool, stable room beats a warm closet every time. Hot fermentation can push fusel alcohols and that “rocket fuel” edge beginners hate. A batch fermented in a steady spot is just calmer. Less drama. Better glass.
Early oxygen is good. Late oxygen is not. A decent way to picture it: oxygen at the start is like setting the table before dinner. Oxygen after fermentation is like knocking the whole plate onto the floor.
If you only change one thing from the bare-bones mead recipe floating around the internet, make it this: use nutrient and treat yeast health like part of the recipe, not an optional gadget trick.
Track gravity and timing so you know what is happening instead of guessing

The hydrometer is the least glamorous tool in the box, and it saves more batches than any fancy fermenter ever will.
Virginia Cooperative Extension and North Dakota State University both explain the same principle in home winemaking guidance: specific gravity tells you how much sugar is in the liquid and how that changes through fermentation. That lets you track progress in a way bubbles never can. Airlock activity is not a finish line.
Step 1. Take an original gravity reading so you know where you started.
This reading gives you context for expected strength and fermentation progress. Many mead musts start somewhere around 1.070 to 1.100 or higher, depending on honey load.
Step 2. Let fermentation work without poking it every day.
Watch the general activity. Don’t mistake activity for completion.
Step 3. Check gravity near the expected end so you can see whether it is still moving.
Many dry meads finish around 1.000 or even below, though the exact number varies by batch.
Step 4. Confirm stable readings before you rack or bottle.
One reading is a snapshot. Stable readings over time tell you fermentation has actually stopped.
| What you see | What it often means | What to do next |
|---|---|---|
| Bubbling slowed a lot | Fermentation may be slowing, or the seal may be leaking | Check gravity |
| Gravity is still dropping | Fermentation is still active | Wait and recheck later |
| Gravity has held steady | Fermentation is likely finished | Rack or bottle if other signs also line up |
| Still cloudy after fermentation | Young mead often needs more time | Leave it alone, rack if needed, or clear later |
A practical note from the homebrew bench: the meads that taught me the most were the ones I logged properly. Honey weight, yeast, nutrient timing, temperature, original gravity, final gravity. That little notebook makes the second batch smarter than the first.
Rack, clear, and age the mead only when each step actually helps

“Secondary” gets treated like a sacred ritual in some homebrew circles. It is not sacred. It is a tool.
Primary fermentation is where the sugar gets turned into alcohol. A later vessel is mostly about clearing, reducing time on the heavier lees, and giving the mead space to settle. That can help. It can also add oxygen exposure and hassle if you do it too soon or do it badly.
Step 1. Rack after fermentation has genuinely settled down.
Use gravity readings and sediment as your cue, not impatience.
Step 2. Keep headspace sensible so oxygen does not chew on the mead.
Too much empty space in a secondary vessel can do more harm than leaving the mead in place a bit longer.
Step 3. Let time do the clearing before you reach for tricks.
Young mead is often cloudy. That alone is not a defect. Patience clears more mead than beginners think.
Step 4. Use fining only if the batch really needs it.
There is nothing heroic about refusing finings, and there is nothing noble about adding them too soon either. Start with patience.
Aging helps many meads because rough alcohol edges soften and flavors knit together. But aging is not a cover-up for a badly stressed fermentation. If the batch fermented hot, stalled hard, or got oxidized, time may soften it some. It won’t rewrite history.
Note: If the mead tastes a bit hot but the gravity is where it should be, don’t panic. A few months can change more than you’d expect. If it tastes like nail polish remover, that is a different conversation.
That distinction matters. Plenty of beginner meads are just young. They are not doomed. They are awkward teenagers.
Decide whether to leave it dry, backsweeten it, or carbonate it
This is where a lot of first batches take a wrong turn because the brewer tries to get cute after doing the hard part correctly.
You really have three paths.
Leave it dry and bottle it still.
This is the cleanest beginner option. If the mead fermented well and tastes balanced, you are done.
Stabilize, then backsweeten.
If the mead finished drier than you wanted, this is the most controlled way to bring honey character back. Let the batch ferment out, confirm stable gravity, stabilize according to the product directions, then add honey in small measured steps and taste as you go.
Carbonate it.
This is not beginner-proof. Carbonation can be wonderful in hydromel or lighter mead, but sugar management has to be precise. Residual sugar, priming sugar, and live yeast inside bottles can turn “sparkling” into “glass grenade.” That is not drama. That is physics.
If you want sweet still mead, don’t try to “catch” fermentation at the perfect moment and pray it stops there. That plan sounds clever and behaves like a trap. Ferment cleanly, stabilize, then backsweeten.
There is also a taste tradeoff worth saying out loud. Dry mead can feel sharper when young. Sweetness can soften that edge, but it can also expose imbalance if the acid, body, and alcohol are fighting each other. Sweetness is not a blanket. It is a spotlight.
Fix the most common beginner problems before you waste the batch
Most batch “failures” are not dead. They are just misread.
| Problem | Most likely cause | What to do now | Change next batch |
|---|---|---|---|
| Tastes hot or solvent-like | Warm fermentation, stressed yeast, weak nutrient plan | Age it and reassess | Cooler fermentation and better nutrient timing |
| Too dry | Yeast fermented more fully than expected | Stabilize, then backsweeten if wanted | Plan sweetness after fermentation, not before |
| Still very sweet and gravity won’t move | Stalled or stressed fermentation | Check temperature and gravity history before doing anything drastic | Use healthier pitch and stronger nutrient plan |
| Cloudy mead | Young mead, suspended yeast, fruit haze | Wait, rack cleanly, fine only if needed | Less rushing |
| No bubbles | Airlock leak, quiet fermentation, or stalled batch | Check gravity | Stop using bubbles as the main metric |
Hot or sharp mead. This often comes from temperature and yeast stress, not from “bad honey.” Leave it alone for a while before you start dumping in oak, spices, tea, acid blend, or whatever the internet suggested at 2 a.m. Young mead can be rough and still come around.
Too dry. This is common, and it is usually fixable. If the mead is stable, backsweetening with the same honey family often brings the profile back into balance.
Too sweet or stuck. Don’t dump more nutrient in blindly. Check the gravity history. Check the room temperature. Check whether the batch started at a gravity that pushed the yeast hard from the jump. Diagnose first. Rescue second.
Cloudy. Time is the first fix. A lot of cloudy mead clears with patience. Pectin from fruit is a different beast, but that is one more reason plain traditional mead is such a good first batch.
No bubbles. This is the classic false alarm. Fermentation can be active with weak airlock activity, and an airlock can bubble from pressure changes even when little is happening. Gravity tells the story.
One more thing: Raisins are not a serious substitute for a proper nutrient plan. They can add character. They are not a magic yeast support system.
If there is an infant in the house, keep one food-safety point straight in your mind: the Food and Drug Administration advises against giving honey to children under 12 months because of infant botulism risk. That is not a mead-specific issue, but it is worth being clear about when raw honey is around the kitchen.
And that is really the pattern with beginner mead. The best batches are not the ones with the longest ingredient list. They are the ones where each step had a reason behind it.
FAQ
Can I make mead without boiling the honey?
Yes. Many home mead makers skip boiling and either mix the honey at room temperature or warm it gently so it pours more easily. That keeps the process simpler and helps preserve more delicate honey aroma.
How long does honey mead take to ferment?
Active fermentation often runs for a few weeks, but that does not mean the mead is ready to bottle or drink at its best. Honey load, yeast strain, nutrient plan, and temperature all change the pace. Stable gravity matters more than the calendar.
What is the best honey for a first mead?
A mild, pleasant honey such as wildflower or orange blossom is a strong place to start. Use one you enjoy tasting on its own. Save the rare, expensive, or very intense varietals for later batches when you already know how your base process behaves.
