Two taps sound like an easy upgrade until the first pint comes out half foam and the second faucet is hooked to the wrong keg coupler. That is usually where this search starts. Not with a dream bar build. With annoyance.
If you are trying to pick the best dual tap for kegerator duty, the safest default for most home setups is a stainless dual-tap tower or complete dual-tap conversion kit with quality faucets, 3/16-inch beer line, and the right gas hardware for the kegs you actually plan to pour. That plain answer works for a lot of people. It falls apart fast if the fridge is a bad fit, the faucets are cheap, or the two kegs need very different pressure.
That is the snag most listicles skip. A double faucet beer tower, a kegerator conversion kit, and a finished dual-tap kegerator are not the same purchase. They fix different problems.
Here is what this guide will help you sort out:
- Which dual-tap path fits the job: tower only, full conversion kit, or full kegerator
- How to match faucets, couplers, and regulator layout to the beers you serve
- What causes first-pour foam, and what usually fixes it
- Which real products make sense for different buyer types
- When a dual tap is smart, and when it is more gear than you need
Fast filter: pick the right lane before you compare shiny hardware
- Tower only: best when the cold box is already sorted and you are upgrading the pour side.
- Full conversion kit: best when a fridge has room for kegs but no draft hardware yet.
- Full dual-tap kegerator: best when built-in ventilation, outdoor use, or low-hassle setup matters more than DIY pride.
Best Suggestions Table (Reviewed and compared with the same fit-first criteria. Click below to jump to the write-up.)
| Product | Best for | Action |
|---|---|---|
| Kegco DT2F-630SS | Best premium dual-tap tower | Check PriceReview |
| Kegco DT145-2BS-630SS | Best for extra clearance | Check PriceReview |
| KegWorks Double Tap Tower Conversion Kit | Best full kit for a fridge conversion | Check PriceReview |
| Kegco Standard Dual Tap Tower Conversion Kit with 5 lb CO2 Tank | Best more-complete starter kit | Check PriceReview |
| Kegland Nukatap SS Forward Sealing Beer Faucet | Best faucet-only upgrade | Check PriceReview |
Tip: the right move is not always “buy a tower.” Sometimes the best buy is a faucet upgrade, and sometimes it is a full kegerator.
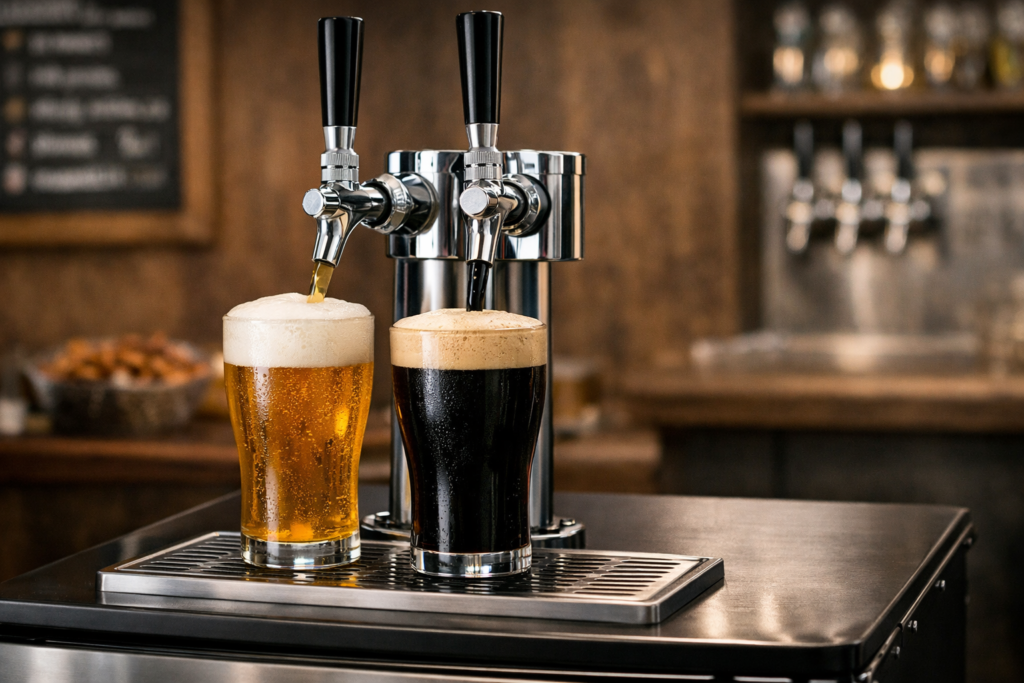
The best dual tap for a kegerator, for most people
For most readers, the best starting point is a stainless 3-inch dual-tap tower or a full dual-tap tower kit built around good faucets and standard beer hardware. That means two beer lines, hardware that fits standard keg couplers, and a regulator setup that does not feel like a mystery box the first night you pour from it.
The reason is simple. Most home kegerator headaches do not come from lacking a second faucet. They come from adding a second faucet to a weak setup. Cheap rear-sealing taps gum up. Warm towers throw a foamy first pint. A fancy tower bolted onto a fridge that barely fits one keg is just polished frustration.
So the generic answer is not “buy the tallest tower you can find” or “buy the kit with the most parts.” It is this: buy the dual-tap path that matches the job, and buy the best faucet setup inside that path.
Remember: if both taps will pour similar beers at similar carbonation, a standard dual-tap setup is usually easy to live with. If one keg is a fizzy wheat beer and the other is a stout or another drink style, the hardware plan changes fast.
Choose tower only, full conversion kit, or full kegerator so the purchase matches the job
A lot of wasted money comes from buying the right part for the wrong setup.
If the cold box is already there and it has room for the kegs you want to run, a dual tap kegerator tower can be enough. This lane makes sense when the fridge or kegerator body is still healthy and you mainly want a better pour side.
If you have a plain fridge with usable interior room, a full kegerator conversion kit is usually the better bet. A complete kit wraps the tower, beer lines, regulator, and coupler hardware into one buy, which cuts down on the annoying “one more fitting” order that drags out a weekend project. Built-in placement changes the rules. Front ventilation matters for under-counter installs, and outdoor-rated models need weather-ready construction. If those needs are already on the list, a conversion kit is usually the wrong lane.
If you need front ventilation, outdoor use, or a cleaner appliance-style finish, skip the tower fantasy and buy a full unit. A built-in vs freestanding kegerator choice is not a minor detail. A freestanding unit shoved into a tight cabinet cooks itself slowly, and then people blame the brand when the install was the real problem.
- Choose tower only when the fridge is already cold and roomy, and you want the fewest extra parts.
- Choose a full conversion kit when you have a fridge and want one-box convenience.
- Choose a full dual-tap kegerator when ventilation, weather resistance, or neat built-in fit matters more than DIY.
For the DIY lane, How to Build a Kegerator is a handy next read because fit mistakes usually happen before the tower even goes on.
Note: dual-tap setups often make room for two sixtels or two Cornelius kegs in home use, but cabinet shape matters more than the brochure photo. Measure the floor, the hump, and the door swing before you buy anything.
Judge dual-tap options by fit, faucet design, and gas control before price
This is the scorecard I would use before I spent a dollar on any double faucet beer tower or dual tap tower kit.
- Fit with your keg plan: Are you serving commercial Sankey D coupler kegs, ball lock Cornelius keg homebrew, or a mix that needs adapters?
- Faucet quality: Forward-sealing faucets stay cleaner and stick less. That matters more than mirror polish.
- Tower geometry: A 3-inch tower is common. A 14-inch tower buys more growler clearance than a standard 12-inch style.
- Gas-side completeness: A dual gauge CO2 regulator and the right line layout save time. They do not give you magic independence between two very different pours.
- Cleanup burden: More parts mean more cleaning. That is not a dealbreaker, but it should be a conscious trade.
- Future-proofing: Can you swap faucets later, add shanks, or adapt to a homebrew dual tap setup without rebuilding the whole rig?
I would put faucet design near the top of that list. A cheap faucet is a little like bad shoes. You notice it every single time you use it. Rear-sealing taps can work, sure, but forward sealing is easier to live with in a home setup that does not get commercial-volume use every day.
Then look at the gas side. Two outlets on a regulator mean two gas lines. That does not mean both kegs can ignore each other. If you are running two similar lagers, fine. If one drink wants a very different carbonation level, shared gas starts to feel cramped.
Pro tip: many tower bundles include 5-foot lengths of 3/16-inch beer line. That is a common starting point, not a law of physics. Treat included line length like a first draft, not the final answer. Brew Your Own makes the same broader point in its draft balancing guide: line balance is a system issue, not a one-number shortcut.
Match the taps to your keg type and pressure plan so both pours make sense
Beer hardware is less forgiving than it looks. A dual-tap setup can look perfectly matched on a product page and still be wrong for the kegs in the fridge.
Most domestic commercial beer in the US runs on a Sankey D coupler. A lot of homebrew runs through ball lock Cornelius kegs. Imports and specialty formats can ask for something else. So before you compare towers, decide what will actually sit inside the box for the next year. That answer should drive the couplers, not the other way around.
The pressure side is where people get tripped up. The American Homebrewers Association gives a good rule of thumb here: many commercial-style pours land in the 2.4 to 2.6 volumes of carbon dioxide range, and at 38 degrees Fahrenheit, 2.6 volumes comes out to about 12.4 pounds per square inch. It also notes that elevation changes the number, with roughly 1 additional pound per square inch for every 2,000 feet. That is the evidence. The takeaway is practical: two beers that like similar carbonation are easy roommates. Two drinks with very different needs are not.
- Pale ale plus lager: often fine on one shared setting.
- Wheat beer plus stout: more likely to feel compromised on one shared setting.
- Beer plus another beverage style: think hard before assuming one regulator setting will keep both happy.
If you keep only one idea from this section, make it this one: two taps do not equal two independent draft systems.
Build for cold, balanced pours instead of shiny foam
The first foamy pour has a way of sending people into parts-shopping mode. Most of the time, the system is asking for colder beer, steadier temperature, a saner pressure setting, or cleaner lines.
The Cicerone Beer Server syllabus puts a number on the first part: draft systems generally run around 38 degrees Fahrenheit, and kegs should sit at service temperature for at least 24 hours before they are tapped and poured. The same source also teaches the boring but useful faucet habit that saves a lot of bad pours: pull the tap fully open. Half-open pours whip beer into foam.
Then there is cleaning. The Brewers Association’s Draught Beer Quality Manual calls for beer line cleaning at least every 14 days. That sounds like commercial-bar discipline, and it is. It is also a smart home habit if the kegerator sees steady use. When beer sits in warm faucet parts or dirty lines, “the tower is bad” is often the wrong diagnosis.
This is the simple test routine I like:
- Chill the keg and get a real baseline. Let it sit cold for a full day before you judge anything.
- Set pressure from the beer’s target, not from a guess. Start with style and temperature, then adjust.
- Pour two beers back to back. If the first is messy and the second cleans up, tower warmth is a fair suspect.
- Check line routing and pinches. Kinks can make a decent system look broken.
- Clean before you chase exotic fixes. Dirty hardware lies to you.
For setup details, How to Set Up a Kegerator covers the assembly side cleanly.
Important: carbon dioxide cylinders should be kept upright and secured. OSHA’s compressed gas guidance is written for work sites, but the storage logic still applies in a home bar or garage.
Best dual-tap product fits by buyer type
These picks are not all trying to do the same job, and that is the whole point. I judged them on fit, faucet quality, gas-side completeness, installation friction, and how likely each one is to stay pleasant after the honeymoon week is over.
How I judged them: published specs, included hardware, faucet design, known install demands, and how each product maps to real home draft scenarios. I did not treat a faucet-only upgrade, a full kit, and a tower-only bundle like they solve the same problem, because they don’t.
Kegco DT2F-630SS
This is the pick for the buyer who already has the cold box handled and wants a premium dual-tap tower without drifting into weird custom territory. The DT2F-630SS is a polished 3-inch stainless tower that comes with two Perlick 630SS forward-sealing faucets and two 5-foot 3/16-inch beer lines. That package matters because the faucets are the part you touch every time you pour. Perlick 630SS faucets have earned their place in home draft setups for a reason: they do not gum up as easily as cheaper rear-sealing taps, and they feel less finicky after a few quiet days between pours.
What I like here is the balance. It is not pretending to be a full system. It is a tower upgrade done with good judgment. If your current tower is the weak link, this sort of swap can change daily use more than people expect. I have seen home setups spend weeks blaming pressure when the faucet design was doing half the damage.
The tradeoff is easy to name. It is still a tower-only purchase. You need the rest of the draft plan sorted already, and standard height means it is not the growler-clearance champion of the group. Buy this when the structure of the system is sound and the pour side is what needs help. Pass if you need a full conversion kit or if extra tower height is a top priority.
Kegco DT145-2BS-630SS
The DT145-2BS-630SS is the tower I would point to if you already know standard towers annoy you. Its headline spec is not flashy, but it is useful: 14 inches tall instead of the more common 12-inch feel, with a 3-inch diameter and Perlick 630SS faucets already fitted. That extra height sounds minor on paper. In use, it changes how the tower feels with taller pint glasses and growlers. No crouching, no awkward angle, less chance of knocking a glass against the faucet body while you pour.
There is another quiet plus here. Taller towers can be easier to live with when the kegerator sits in a spot where you regularly fill pitchers or larger vessels. If that sounds oddly specific, well, it is. Little clearance issues become repetitive fast. They are the kind of thing you shrug off at first and then start resenting a month later.
The compromise is that this is still a tower-only answer. It does not fix a cramped cabinet, weak gas-side hardware, or a mismatch between keg type and couplers. Buy it when the chassis is fine and you want a nicer, less cramped pour experience. Skip it if you need a complete hardware path or if the standard-height DT2F style already gives you all the room you need.
KegWorks Double Tap Tower Conversion Kit
This kit is for the person who has a fridge, wants a proper two-product setup, and would rather not assemble a kegerator from six browser tabs and a notebook full of part numbers. KegWorks positions it as a two-faucet tower kegerator conversion kit for two kegs, built around a stainless steel tower, a two-product double-gauge regulator, and US Sankey D system compatibility for most domestic kegs. It also calls out something many pages gloss over: it is best for smaller, shorter fridges only if two kegs can sit perfectly flat inside. That is the kind of plain wording I trust.
I like this pick because it respects the install. It does not act as if the fridge itself is a blank, infinite box. You still need to measure the floor and hump, but the kit’s job is coherent. It gets you into the full conversion lane without sending you off to source the gas side piece by piece.
The tradeoff is that the no-tank version is not the cheapest route to a “working by tonight” setup if you have nothing already. It also leans into Sankey D assumptions, so a homebrew-heavy buyer with ball lock kegs will need to plan that side properly. Buy this if you want a tidy fridge conversion path. Pass if you want a faucet-only upgrade or you need a kit that arrives with a CO2 cylinder in the box.
Kegco Standard Dual Tap Tower Conversion Kit with 5 lb CO2 Tank
This is the more-complete starter path for a fridge conversion. Kegco sells it as a standard dual-tap tower conversion kit with a 5-pound CO2 tank, a pro-series dual gauge regulator, and American D system Sankey coupler hardware. That inclusion list is the reason it makes the cut. A lot of first-time dual-tap buyers do not need a boutique tower. They need the setup to stop asking for missing parts.
I would lean toward this kit when the goal is speed and completeness, not when the goal is polishing a dream build one faucet at a time. You get the tank, the regulator, the tower, and coupler hardware in a single package, which lowers the odds of the project stalling halfway through because one fitting or clamp is still in transit. That is not glamorous, but it counts.
The thing to watch is the faucet tier. This is a strong convenience pick, not the pick I would choose over a premium forward-sealing faucet bundle if the rest of the system was already in place. Buy it when you want a broad, usable starting package and do not already own gas hardware. Skip it if your current setup is functional and you are only trying to upgrade the actual pour experience.
Kegland Nukatap SS Forward Sealing Beer Faucet
This is the oddball in the list, and I mean that in a good way. The Nukatap SS is not a tower or a conversion kit. It is a faucet-only upgrade. That makes it the right answer for a surprising number of readers who think they need a second tower when what they really need is a better first pour. Kegland’s design centers on forward sealing, lower thermal mass, and a smoother internal flow path meant to cut turbulence and cut down first-pour foam. Those are not fluffy marketing claims when you think about the problem. Warm, sticky, turbulent faucet parts are where a lot of home draft irritation starts.
I like the Nukatap SS most for existing dual-tap owners whose tower is fine but whose faucets are not. If the tower column is decent and the lines are serviceable, a faucet swap can be the cheapest way to make the kegerator feel less cranky. It also has the kind of practical upside that never looks exciting in a photo: less sticking after a few days off.
What it will not do is save a bad system. A faucet upgrade cannot fix wrong couplers, a cramped fridge, dirty beer lines, or a gas plan that makes both taps compromise. Buy it when you have a usable dual-tap base and want a smarter faucet. Pass if you are starting from scratch.
Know when a full dual-tap kegerator is the smarter buy
Sometimes the cleanest answer is to stop trying to turn a random fridge into a bar appliance.
A full dual-tap kegerator makes more sense when any of these are true:
- there is no spare fridge worth drilling
- the setup needs front ventilation for built-in use
- the unit will live outside or in a humid, rougher space
- you want the look and simplicity of a finished appliance
This is where many readers should stop chasing towers. A built-in unit with front venting is a different animal from a freestanding box with a tower on top. The same goes for an outdoor-rated kegerator. Tougher stainless exteriors and sealed-back construction are not cosmetic. They are part of why those units survive conditions that chew up ordinary indoor gear.
If the search has shifted from “upgrade my faucet tower” to “I need a stable dual-tap appliance,” go read 7 Best Kegerators for Cold, Hassle-Free Draft Beer at Home. It is the better lane once cabinet fit, ventilation, and appliance finish matter more than DIY flexibility.
There is a quieter reason to buy a full unit too. Some fridge conversions end up looking cheap, feeling cramped, and running warm at the tower because the base fridge was never a good host. When that is the trajectory, forcing the conversion rarely saves money in any satisfying way.
Avoid the mistakes that make dual-tap setups annoying to live with
The most common mistake is buying by tap count. Two taps sound better than one, so people jump straight to “dual” before they ask how quickly they finish beer, whether both kegs want similar pressure, and whether the fridge actually fits the setup without gymnastics.
The second mistake is assuming a dual-outlet regulator means true freedom. It does not. It means two gas paths, and that is useful. It is not the same as giving wildly different beverages their own perfect world.
The third one is chasing foam with shiny hardware. I have watched home draft setups throw money at towers, shanks, and handles while the keg was warm, the line was kinked, or the faucet had not been cleaned in far too long. The Brewers Association says lines should be cleaned every 14 days. That schedule is not overkill if the kegerator is in regular use. Dirty systems fake a lot of symptoms.
Then there is coupler mismatch. This one is almost comic until it happens on a Friday night. The tower looks right, the gas side is assembled, the keg arrives, and the coupler is wrong. Commercial beer on Sankey D, homebrew on ball lock, specialty imports on something else. Decide that before you buy the hardware.
And a small but real one: do not shop tower height like it is pure style. A 14-inch tower is not “better” in the abstract. It is better if extra glass clearance changes how you use the kegerator. If not, a standard-height tower is fine.
If the pace of drinking is slow and keg freshness is already a struggle, a dual tap may be overkill. In that case, 7 Best Beer Keg and Dispenser Picks for Better Draft Beer at Home is a better next step than forcing a two-tap setup that will spend more time waiting than pouring.
Remember: the best dual tap for kegerator use is not the one with the flashiest tower. It is the one that matches the keg plan, the pressure plan, and the amount of maintenance you will actually keep up with.
FAQ
Do I need a tower cooling fan for a home dual-tap setup?
Not always. If the keg is fully chilled, the tower is short, and first-pour foam is mild, you may never need one. If the first pint is messy and the second clears up, tower warmth is a fair suspect, and a cooling fan starts to make sense.
Can a single-tap kegerator be converted to dual tap?
Yes, often. The usual routes are swapping to a dual-tap tower, changing the shank layout, or moving to a full conversion kit. The catch is space. The cabinet still has to hold the kegs and gas hardware you want to run.
Are dual taps worth it if I only finish one keg every few weeks?
Maybe not. If beer sits a long time and the second keg is more fantasy than habit, a better single-tap setup can be the smarter buy. Dual taps shine when both lines get enough use to justify the extra cleaning and hardware.
