You can build a keezer with a chest freezer, a wooden collar, an external temperature controller, and a balanced draft beer setup. That is the short answer. The part that trips people up is not the woodwork. It is picking a freezer that really fits your kegs, then laying out the gas and beer hardware so the thing pours cleanly instead of hissing CO2 and spitting foam.
I have seen the same build go sideways twice for two different reasons. One friend bought a freezer by cubic feet and learned, too late, that the compressor hump ate a keg slot. Another built a handsome collar, drilled perfect faucet holes, and then found the ball-lock disconnects kissed the lid every time it closed. Both had done the “easy” parts. Both had skipped the decisions that matter first.
So if you are searching how to build a keezer, start here: fit first, collar second, draft balance third, pretty details last.
- How to choose a chest freezer that actually fits your keg mix
- How to pick collar height without guessing
- How to place the CO2 tank, regulator, gas manifold, and lines so loading stays easy
- How to avoid foam, leaks, and condensation
- What to build now, and what can wait until version two
Start Here
| If this sounds like you | Check this first | Why |
|---|---|---|
| “I want 3 or 4 taps.” | Measure keg footprint and hump layout | Tap count is easy to dream up. Interior fit is the hard limit. |
| “I already bought the freezer.” | Dry-fit kegs and disconnects before cutting lumber | Collar height should match your actual clearance, not a random forum build. |
| “I care most about good pours.” | Beer line diameter, line length, and temp control | A keezer can look perfect and still pour badly if the line balance is off. |
| “I want it to look clean.” | Build the functional version first | Casters, trim, and fancy tops are easy later. Redoing a bad collar is not. |
Build a keezer the simple way: choose fit, add a collar, balance the pour
A keezer is just a chest freezer kegerator. The freezer gives you cold storage. The collar gives you a safe place to mount shanks and buys height for keg posts and disconnects. The temperature controller keeps the freezer in serving range instead of dropping into deep-freeze territory. Then the draft system does the rest: CO2 tank, regulator, gas line, beer line, faucet, done.
But “done” is where a lot of guides get a bit hand-wavy.
The build only feels simple if three decisions were right before the first board was cut:
- Does the chest freezer really fit the keg sizes you plan to use?
- Is the keezer collar tall enough for your disconnects and lid swing?
- Are the beer lines and serving temp set up so the faucet pours, not erupts?
If those three land in the right place, a keezer build is pretty forgiving. If they do not, the project turns into one long chain of tiny annoyances. The lid rubs. The tank steals a keg slot. The first pour is all head. Then you start fiddling with pressure because it feels like progress.
Note: A nice-looking keezer is not the same as an easy-living keezer. The ones people love six months later are the builds that load kegs easily, seal well, and pour the same way every weekend.
Choose the right freezer and avoid the mistake that ruins the layout

The usual shopping mistake is buying by cubic feet. That number gives a rough clue, but not a layout. What matters is usable floor area, the size and shape of the freezer hump, and the distance from floor to lid once ball-lock or pin-lock disconnects are attached.
So start with kegs, not the freezer listing.
Step 1. Measure your keg mix and get a real footprint.
If you run standard corny kegs, sketch the circle each keg needs on the floor of the freezer. Then account for the hump. Then add the height of the keg plus the disconnect. This is the bit people skip, and it bites.
Step 2. Check lid clearance and hump shape before you buy.
A larger hump can wreck an otherwise good freezer for a four-keg layout. A slightly smaller freezer with a friendlier hump sometimes fits better than a bigger one with awkward geometry. I know, annoying. Still true.
Step 3. Look at air space around the freezer.
Manufacturer guidance matters here. Frigidaire’s chest freezer instructions warn that the insulated cabinet is sealed and say not to drill holes in the cabinet because that can break the seal and hit wiring or refrigeration parts. The same documentation also notes that the unit needs room for air circulation around it. That is why keezer builders drill the collar, not the body of the freezer, and why cramming the unit tight against everything is a bad bet. See the installation and insulation guidance in the Frigidaire manual.
| Build goal | Freezer shopping rule | What usually goes wrong |
|---|---|---|
| 2 taps, simple homebrew setup | Small to mid-size freezer with clear height specs | Tank inside steals room you thought you had |
| 3 to 4 taps | Mid-size freezer with hump planned from day one | Tap spacing fits, keg arrangement does not |
| 5 taps or future expansion | Bigger freezer, often with CO2 outside | Inside tank eats the “future” space |
A fast rule: if the freezer only works on paper when the tank sits in the perfect corner and no hose bends badly, treat that as not fitting. Leave yourself a little forgiveness.
Plan the interior on paper so you do not rebuild it in wood

This is the unglamorous step that saves the project.
Step 1. Measure your kegs and disconnects so the lid clears.
Dry-fit empty kegs if you have them. If not, use the published keg dimensions and add the extra height for the disconnect style you plan to use. Ball-lock posts plus disconnects are often the clearance killer. Not the keg body itself.
Step 2. Map the hump so the odd space earns its keep.
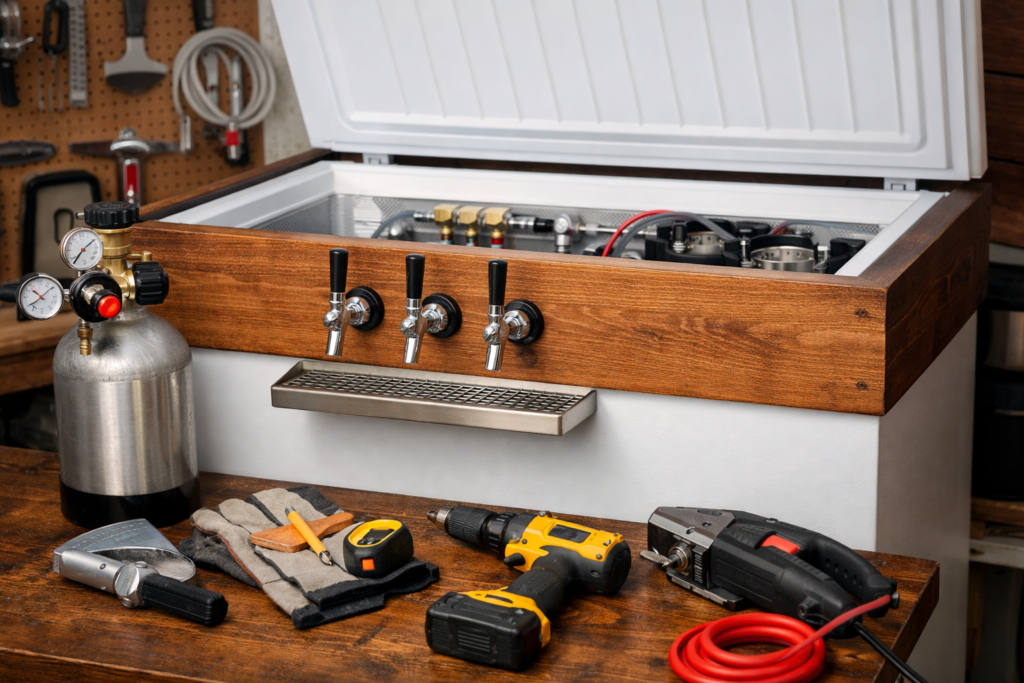
Some builders waste the hump. Better move: use it for the CO2 tank, a smaller keg, or a compact gas manifold if the freezer shape allows. A keezer with the hump ignored often ends up larger than it needed to be.
Step 3. Decide where the CO2 tank lives so capacity stays honest.
An internal CO2 tank keeps the exterior tidy, and it keeps the line run short. An external tank frees interior room and makes refills easier. The tradeoff is planning a clean pass-through without touching the sealed freezer walls. If space is tight, outside is often the saner call.
Step 4. Sketch tap spacing so the front feels usable.
Taps placed too close together look neat in a parts photo and get annoying fast with larger handles or a wide drip tray. Leave enough room for your hand, for the shank nuts behind the collar, and for future you standing there with a full pint and slightly cold fingers.
Pro tip: Use painter’s tape on the collar blank and mark every shank center, regulator path, manifold screw point, and probe route before drilling anything. The tape version shows layout mistakes faster than your brain does.
If you are still torn between a keezer and an upright fridge build, this kegerator build guide helps sort the tradeoff cleanly.
Build the collar that gives you clearance without making the keezer awkward

The keezer collar does three jobs. It creates a drill-safe band for the faucet shanks. It adds vertical clearance. And it gives you a place to mount hardware without messing with the insulated cabinet.
That does not mean taller is always better.
Step 1. Pick the shortest collar that clears your setup.
If your kegs and disconnects clear with a modest collar, stop there. A very tall collar can make loading kegs awkward, raise faucet height more than you want, and add visual bulk. Readers often picture height as flexibility. Sometimes it is just a shin-high wall you get tired of lifting over.
Step 2. Dry-fit the collar before finishing it.
Set the boards in place. Check the lid. Check hinge travel. Check that the shank nuts will have room behind the collar. Then take it apart and do the nice work. Not the other way round.
Step 3. Seal the collar joints so moisture does not work its way in.
A keezer lives in a cold, damp little environment. Bare wood and lazy seams do not age well. Use a good seal at the freezer-to-collar contact point, then finish the wood for moisture resistance.
Step 4. Reattach the lid carefully and test alignment.
Brulosophy’s keezer build notes the spring-loaded hinge issue plainly, and that matches real life. Those hinges are not hard, but they deserve respect because they can shift on you while you’re trying to align everything. See the hinge warning and build notes here.
A practical rule for collar height: if the collar exists only because a forum photo used the same board size, pause. Measure your keg, your disconnect, and the lid clearance. Then build for that.
Install the draft hardware that pours well instead of just looking finished

This is where a lot of keezer builds look complete long before they work well.
Step 1. Pick faucets that stay cleaner in normal use.
Forward-sealing faucets cost more than the cheap rear-sealing style, but they are easier to live with. Less sticking. Less crust. Less swearing on the first pour after a week away.
Step 2. Match shank length to the actual collar thickness.
Too short and the hardware fight begins. Too long and the backside gets clumsy. Measure the finished collar, not the nominal board size from the lumber rack.
Step 3. Set the gas side up for the beer you actually serve.
A single-pressure regulator works for a lot of home setups. If you plan to serve different carbonation levels at once, that is when secondary regulators or a more flexible gas manifold start earning their keep.
Step 4. Use line balance as a design tool, not a late-stage patch.
Micro Matic’s direct-draw balancing guide says 3/16″ inside-diameter vinyl beer tubing is used in direct-draw systems and gives roughly 3 PSI of restriction per foot. The same guide explains a balanced system as one where the applied pressure and total restriction meet at roughly the same point, which produces a flow rate near 128 ounces per minute. That is a useful way to think about a keezer: not “what line length do people use?” but “what restriction does this setup need?” See the direct-draw draft balancing guide.
The Brewers Association’s Draught Beer Quality Manual is also handy here. It lists 3/16″ vinyl line with a dynamic resistance value around 3.00 lb./ft. and notes that exact values vary by system component and manufacturer. That last bit matters. Use the numbers to get close, then tune the setup rather than treating any forum line-length claim like gospel. The manual is here.
What to check first if the pour is bad
| Symptom | Most likely cause | First check |
|---|---|---|
| Foamy first pour, better second pour | Warm faucet or short warm line section | Temperature drift near the collar and faucet body |
| Foam every time | Line balance or warm keg | Serving temp, line diameter, line length, pressure |
| Flat beer | Low pressure or leak | Gas fittings, regulator setting, lid and keg seals |
| Slow, choppy pour | Restriction too high or gas issue | Kinked line, bad fitting, frozen spot, regulator flow |
One strong rule here: do not treat pressure changes like a slot machine. Check temperature first. Then line balance. Then gas leaks.
Add temperature control and airflow so the keezer serves beer, not slush
A chest freezer wants to freeze. A keezer wants to hold serving temp. Those are not the same job, so the freezer needs an external temperature controller.
The Brewers Association manual says kegs should be at or below 38°F when served, and it includes chilling tables that show how long a keg can take to come down from warmer temps. That matters because a keg that “feels cold” can still pour like a mess if it is not fully chilled through. See the serving-temperature section in the manual.
Step 1. Plug the freezer into an external controller and set a sane target.
A conservative serving target around the high 30s is a solid starting point for many draft beer setups. Then let the system settle. Do not judge it after twenty minutes and a bit of wishful thinking.
Step 2. Put the probe where it reflects the beer, not the warmest puff of air.
Probe placement changes behavior. Bad placement can make the compressor short-cycle or drift. Keep it stable and protected.
Step 3. Add airflow only when your build actually needs it.
A collar-tap keezer is simpler than a coffin box or tower setup because the beer path stays cold more easily. If your taps live in a warmer structure above the lid, airflow fans become a lot more useful. That first-pour foam that improves on the second pour? Warm faucet bodies are a common culprit.
Note: If the first pour is wild and the second looks normal, resist the urge to crank the regulator. Check the cold path first.
For readers comparing controller styles, this temp controller guide lays out the plug-and-play options clearly.
Test for leaks, foam, and condensation before you call the build done
The keezer is not finished when the taps are on. It is finished when the thing behaves.
Step 1. Pressurize the gas side and hunt leaks on purpose.
Mix a bit of sanitizer or soapy water, paint it onto the fittings, and watch for bubbles. Tiny leaks waste gas for weeks before they announce themselves. A CO2 tank that seems to empty for no reason is often telling the truth.
Step 2. Check the safety side with a level head.
The CDC’s NIOSH pocket guide lists a recommended exposure limit for carbon dioxide of 5,000 ppm as a time-weighted average and 30,000 ppm as a short-term limit. In plain English: respect leaks, especially in tight utility spaces, basements, or little brew rooms with poor air movement. See the NIOSH carbon dioxide guide.
Step 3. Pour and diagnose one variable at a time.
Do not change pressure, line length, and temperature all in the same afternoon and then try to learn from the result. If the keg is warm, chill it fully first. If the temp is stable, look at line balance. If the pour is weird and the tank gauge falls, check leaks before anything else.
Step 4. Check for water where it should not be.
A bit of condensation is normal in many builds. Pools of water, wet wood, or a collar seam that always feels damp point to sealing issues or air leaks. Catch those early. Damp wood gets old fast.
Decide which upgrades are worth doing now and which can wait
This is the fork where a clean, useful build can wander off into furniture cosplay.
Some upgrades earn their place early. Others just make the first version slower and fussier.
Build now if it changes daily use:
- Good faucets
- Balanced beer line setup
- Thoughtful drip tray placement
- Easy-to-reach gas hardware
- Casters, if the keezer will ever need to move
Build later if it is mostly cosmetic or adds complexity:
- Coffin box towers
- Decorative top surfaces
- LED lighting
- Fancy trim and branding
- Extras that block service access
A coffin box can look brilliant. It also puts more of the draft path in warmer air, which means more need for circulation and more ways to create first-pour problems. A plain collar tap layout is not sexy, maybe, but it is easy to keep cold and easy to service. There is a reason so many experienced homebrew keezer builds settle there.
If the goal is a reliable first version, pick boring where boring pays you back.
And if you want a clean checklist for line hookup and first-pour setup after the build is done, this setup guide maps well to keezer commissioning too.
Keep the keezer running clean with a simple maintenance rhythm
Cold does not make a draft system clean. It just makes the neglect less obvious for a while.
The Brewers Association’s Draught Beer Quality Manual says draught line cleaning should happen at minimum every two weeks, with faucet cleaning on the same rhythm in commercial-style systems. A home keezer with lighter use is not the same environment, fair enough, but the larger lesson still holds: line cleaning is routine care, not a rescue move after the beer tastes odd.
A simple rhythm works well:
- Wipe up moisture and check the collar seal as you go
- Look for frost buildup before it steals room or cooling performance
- Recheck gas fittings after tank swaps
- Clean faucets and lines on a schedule, not only after a bad pour
One more lived-in note here: keezer neglect often starts with one harmless shortcut. You skip a line clean because the stout seems fine. Then the pale ale tastes a little muddy. Then you wonder if the keg was the problem. Usually it was not the keg.
Keep the rhythm simple and you will actually stick to it.
FAQ
Do I need a collar to build a keezer?
For most builds, yes. The collar gives you a safe place to mount faucets and adds clearance for keg posts and disconnects. Drilling the freezer cabinet is a bad move because the insulated walls can hide wiring and refrigeration parts.
Is it better to keep the CO2 tank inside or outside the keezer?
Inside looks tidy and keeps the setup compact. Outside frees room for more keg capacity and makes tank swaps easier. In tighter builds, the outside placement often wins because it stops the tank from stealing the slot you really wanted for beer.
Why does my keezer foam on the first pour but settle down on the second?
That pattern often points to a warm faucet body or a short warm section of beer line near the collar or tower. Check temperature drift and airflow before changing pressure. If the second pour improves fast, the faucet area is usually where the clue lives.
