You can build a kegerator at home, and the basic recipe is simple: start with a fridge or chest freezer that truly fits your keg setup, add a balanced draft system, keep the beer cold, and give the lines enough resistance so the faucet doesn’t spit foam at you all night.
The snag is that most bad builds fail before the first hole gets drilled. The fridge is too tight. The keg fits, but the coupler does not. The tower looks great, but the first pour is warm and frothy. I have seen this play out with used mini fridges more times than I’d like to admit. On paper they looked perfect. In person, the compressor hump ate half the floor and the door shelves stole the rest.
So the useful answer is not “buy a tower and hook up CO2.” It’s this: build around your keg format, your tap count, and your cabinet’s actual interior shape. Get those three right and the rest feels like assembly. Get them wrong and the whole project turns into a weird little punishment.
Here’s what this guide covers:
- How to choose between a mini fridge, full-size fridge, and keezer
- What to measure before you buy any draft hardware
- Which tap location makes the build easier, not just prettier
- How to connect the gas and beer side without creating a foam machine
- What to check first when a new build pours badly
- How much cleaning a home draft setup actually asks of you
Start here: what to check first
| If this sounds like you | Check this first | Best next move |
|---|---|---|
| “I found a cheap mini fridge” | Compressor hump, door intrusion, keg plus coupler height | Do a cardboard mock-up before buying hardware |
| “I want two or three taps” | Interior width and whether a keezer will be easier | Compare fridge conversion against collar-mounted chest freezer |
| “My pours are all foam” | Beer temperature first, then line length, then pressure | Chill the keg fully and rebalance the system |
| “I just want draft beer without a project” | How much drilling, fitting, and cleaning you actually want | Skip DIY and look at finished units |
Build the right draft setup before you touch a drill
A kegerator is not really a tower, or a faucet, or a shiny tap handle. It is a cold box plus a draft system that is in balance. That’s the whole game.
The Brewers Association’s Draught Beer Quality Manual lays out the pieces that matter in direct-draw systems: beer temperature, applied gas pressure, and the resistance in the beer line. That matters because readers often treat those like fine-tuning details. They aren’t. They’re the build.
So before you start shopping for a beer tower or a conversion kit, pick your build path:
- Fridge conversion if you want one or two taps, easier loading, and a cabinet that opens like a normal appliance.
- Keezer build if you want more keg capacity and a collar-mounted faucet layout.
- Finished kegerator if you want draft beer at home but don’t want to spend a weekend measuring, drilling, and arguing with tubing.
Note: If the plan in your head starts with “I’ll make this tiny fridge work somehow,” stop there. “Somehow” is how a lot of bad builds begin.
The smartest homebrew and draft projects have a boring backbone. The box fits the kegs. The lines make sense. The gas path is tidy. Nothing heroic. That’s why they keep working.
Choose a fridge, mini fridge, or keezer that actually fits your keg plan

Pick the keg format first. That single choice changes the whole build.
If you’re pouring homebrew from Cornelius kegs, you’re usually working with ball lock fittings. If you’re serving commercial beer, you’re likely using a Sankey coupler. Those fittings sit on top of the keg, and that top clearance is where people get burned. The keg body fits. The disconnect or coupler does not. Door closes halfway. Project dead.
What to measure before buying anything:
- Interior width at the floor and above the compressor hump
- Usable depth with the door fully closed
- Interior height from floor or hump to ceiling
- Extra height needed for a ball lock disconnect or Sankey coupler
- Door shelf intrusion and molded plastic that steals space
Used-fridge shopping gets easier if you bring a cardboard template. Make one for the keg diameter and another for total height with fittings attached. It looks a little goofy in the parking lot. It saves money.
Some quick rules help here:
- If the keg only fits after heavy shelf surgery and awkward line routing, skip that fridge.
- If you want more than two corny kegs, a chest freezer with a collar often feels cleaner than cramming everything into an upright cabinet.
- If the door shelves are thick and fixed, don’t assume you’ll trim them neatly. Some come apart easily. Some fight back.
For readers weighing DIY against a finished unit, this is where a roundup like these home kegerators becomes handy. Not for shopping hype. Just to compare what a purpose-built cabinet solves for you right out of the box.
Pro Tip: Measure the compressor hump like it’s a separate room. In a lot of uprights, that hump decides the whole build.
One more thing. Garages and hot patios change the math. A fridge conversion that behaves nicely in a cool kitchen can struggle in summer heat. If the setup will live in a warm space, a keezer with an external controller usually gives you more breathing room.
Pick the tap location that makes the build easier to live with

There are three normal ways to place the tap: through the door, through the top with a beer tower, or through a keezer collar. All three work. They just fail in different ways.
Door-mount shank and faucet: often the least dramatic fridge conversion. The door is usually safer to drill than unknown side walls, and the faucet sits where the beer line stays shorter and simpler. The catch is that the line moves with the door, so routing has to stay neat.
Tower-mount on top: looks the part. This is what most people picture when they hear “kegerator.” It also introduces one of the most common annoyances in DIY draft setups: warm tower hardware. The beer in the tower warms between pours, and then the first ounce or two foams like it’s trying to escape.
Collar-mount on a keezer: this is the tidy answer for multi-tap builds. You avoid drilling the freezer body, gain a place to mount shanks, and buy yourself more room for line routing. The tradeoff is lifting kegs in and out of a chest freezer, which is less fun after the second or third full keg.
Use this shortcut:
- If you want one simple tap on an upright cabinet, door mount is often the lowest-risk move.
- If you care most about the bar look and you’re fine adding tower cooling or living with some first-pour fuss, tower mount is fine.
- If you want three taps, maybe four, stop trying to make a mini fridge do chest-freezer work.
Note: A lot of people choose a tower because it looks like a “real” kegerator. Fair enough. Just know that looks and easy dispensing are not always the same thing.
That sounds obvious, but it changes builds. The cleanest setup is not always the prettiest one in the product photo.
Gather the parts that matter and skip the stuff that only looks useful
Think in one straight chain: CO2 tank to regulator to gas line to keg to beer line to faucet. If a part doesn’t help that chain work, it may not belong in a first build.
For a basic single-keg setup, the core list is short:
- CO2 cylinder
- Dual-gauge regulator
- Gas line and clamps
- Keg coupler or ball lock gas and liquid disconnects
- Beer line
- Shank and faucet, or tower with faucet
- Drip tray if you like your floor
Then come the “only if you need them” parts:
- Gas manifold for multiple kegs
- Secondary regulators if different kegs need different pressure
- Tower fan for taller tower builds
- External temperature controller for a keezer
The Cicerone Certified Beer Server syllabus and the Brewers Association manual both hammer the same point: draft quality starts with cold beer held at draft-ready temperature. That makes the regulator, line size, and cabinet choice functional parts, not accessories.
For many simple direct-draw home systems, builders use 3/16-inch inside-diameter beer line because it adds more resistance than larger vinyl line. That helps slow the pour to something civilized. A shorter, fatter line often looks cleaner in the fridge. It can pour like a fire hose.
If you’re building for homebrew, keep the first version simple. One pressure, one keg type, one faucet. Fancy gas management is great right up until you’re troubleshooting three variables at once.
Pro Tip: Forward-sealing stainless faucets cost more than the bargain stuff, but they stay cleaner and stick less. That’s one place where buying once hurts less.
Mark, drill, and mount without ruining the refrigerator

This is the part people dramatize, but the job itself is plain if you slow down.
Mark the safe drilling zone and avoid hidden cooling lines
Find the drilling path first. On many conversions, the door is the friendliest place to work. Tops and side walls can hide refrigeration lines or wiring. If you are not sure where those lines run, don’t guess. Switch to a safer drilling path or get confirmation from the appliance documentation.
Drill pilot holes and keep the finish clean
Tape the drill area, mark the center, and start with a pilot hole. That lets you check placement and helps stop the finish from chipping. A hole saw is the usual move for shanks and tower openings, but the pilot hole is the moment that tells you whether your plan still makes sense.
Mount the tower or shank so it stays stable and sealed
Dry-fit everything before tightening it down. Make sure the nut clears the interior wall, the tubing bends without kinking, and the faucet lands at a usable height. Then mount it for real and seal exposed insulation or bare foam so you don’t create a damp little mess inside the cabinet.
Route gas and beer lines without kinks
Let the tubing travel in broad bends. Tight, pinched turns starve the line and create strange pouring behavior. If the cabinet has a drain hole that can take the gas line, that is often a neat way to keep the CO2 tank outside and reclaim interior space.
The safety piece here is not theatrical. The OSHA compressed gas standard exists for a reason, and drilling into a refrigerant line can kill the appliance in one lazy moment. That’s not “DIY is dangerous.” That’s just physics being blunt.
Note: Do the full dry-fit with keg, disconnect, and tubing in place before the final hole gets enlarged. Half of the “ugh” moments show up right there.
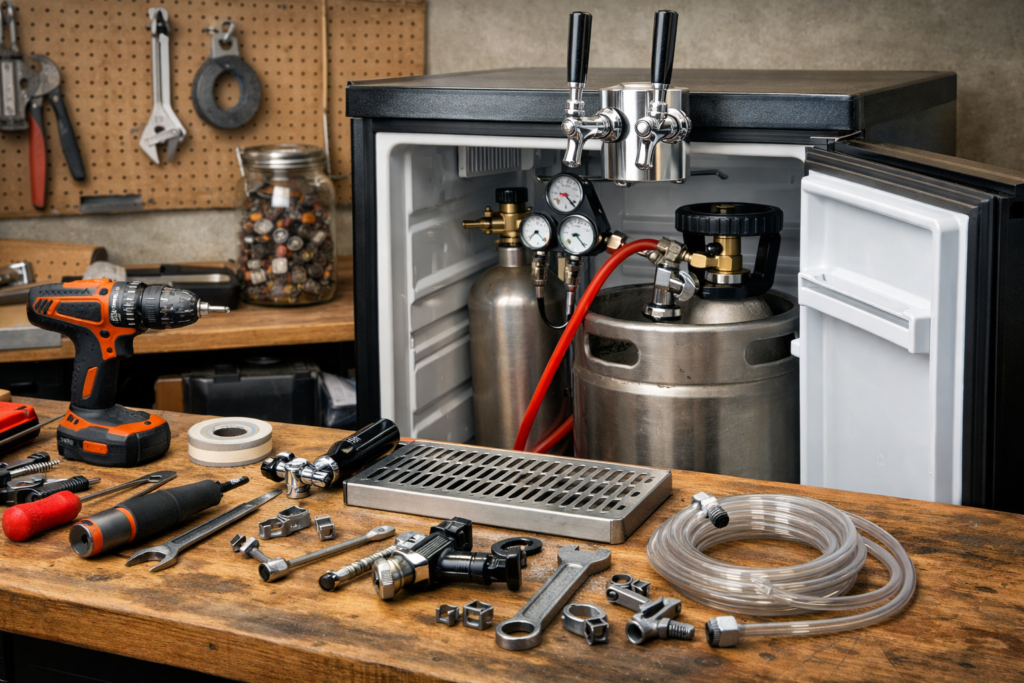
Connect the gas and beer side so the first pour is not a foam bomb

The Brewers Association gives a very practical target for direct-draw draft systems: cooler air around 36 to 38 degrees Fahrenheit. It also points out that many ales and lagers dispensed on 100 percent CO2 in direct-draw setups sit in the 12 to 15 psi range during routine checks. That gives you a grounded starting point. Then you match pressure to temperature and line resistance instead of copying a number from a random forum post.
Put the CO2 cylinder where space and condensation work in your favor
Inside the cabinet is simple, but it eats space. Outside the cabinet gives you more keg room and can help keep the regulator away from moisture. If the gas line can pass through a drain port or another safe opening, that’s often the nicer setup.
Connect gas lines and clamp them securely
Push tubing fully over the barbs. Clamp every connection. Then pressurize the system and check each joint with soapy water. Tiny bubbles tell the truth fast.
Connect beer lines with enough length to create resistance
For common home direct-draw systems using 3/16-inch line, don’t trim the line short just because the inside looks messy. That extra resistance is usually doing a real job. If the beer rushes out too fast, you are not “getting better flow.” You’re often watching dissolved CO2 break out of the beer because the system isn’t balanced.
Leak-test before serving beer
Gas-only testing saves time. Pressurize the empty system, watch the gauges, check every fitting, and leave it long enough to catch a slow leak. This step is dull. It also beats discovering an empty CO2 tank and flat keg on day two.
Quick diagnosis of your problem & how to fix it
| Symptom | Most likely cause | Check next |
|---|---|---|
| Fast, foamy pours | Warm keg or low line resistance | Beer temperature, then line size and length |
| First pour foamy, later pours better | Warm tower or warm faucet area | Tower cooling and idle-time warmth |
| Pressure keeps dropping | Gas leak | Regulator, clamps, keg posts, and coupler seals |
| Beer tastes dull or odd | Dirty lines or old seals | Clean the system before changing pressure |
One quiet gotcha: don’t start by cranking the pressure way down to stop foam. If the beer is warm or the line is too short, low pressure can make the pour weird in a different way. Fix the temperature and balance first.
Chill the keg, balance the pour, and fix foam before you start blaming the build
The Brewers Association manual gives a few numbers that are more useful than most internet advice. It recommends draft-cooler air at 36 to 38 degrees Fahrenheit. It also notes that a keg at 44 degrees can still need roughly 18 hours to get back down to 38 degrees, and a keg at 50 degrees can need about 25 hours. That is why a “newly installed” keg often pours like a mess at first.
So if your build foams, check in this order:
- Is the keg fully cold?
- Is the beer line giving enough resistance?
- Is the pressure set for the beer’s actual temperature?
- Is the line clean and the faucet free of sticky crud?
This order matters. A warm keg can make a perfectly good build look broken. I’ve watched people swap regulators, shorten lines, even blame the faucet, when the keg had only been in the cabinet for four or five hours. Beer is stubborn like that.
Tower builds add one extra wrinkle. If the first pour is foamy and the next one settles down, the keg may be fine and the tower may be warm. That little column of metal and air above the cabinet warms up between pours. The beer trapped there is the first to complain.
Here’s the practical rule: if the pour is fast and frothy, don’t guess. Read the beer temp, then inspect line length, then adjust pressure in small moves. Keep notes. One of the easiest ways to turn draft setup into chaos is changing three things in ten minutes and then trying to remember what fixed it.
Pro Tip: If the keg came warm from transport, give it a full day before judging the system. That feels annoyingly slow. It is still faster than chasing phantom problems.
If you go the keezer route, an external controller becomes part of this balance story too. A guide like this temp controller breakdown helps sort out the controller side if you’re converting a chest freezer and want stable serving temps without freezing the beer.
Clean it on schedule or your clever build will still pour bad beer
The part nobody wants to hear is also the part that separates a fun kegerator from a crusty one. Draft systems need cleaning. Not once in a while. On a schedule.
The Brewers Association recommends cleaning draught lines at least every two weeks in normal service, with faucets disassembled and cleaned on that same cadence. That’s a commercial-quality standard, but it translates well to home systems because old beer film and sticky faucet internals don’t care whether the bar is busy or your setup sits in a basement corner.
What that means for you:
- If you only pour occasionally, stale beer can sit in the faucet and line longer than you think.
- If you want multiple taps, you’re also signing up for more cleaning and more seals to inspect.
- If beer suddenly tastes flat, sour, or just “off,” clean first. Don’t start with pressure changes.
A small single-tap setup is easier to live with partly because maintenance stays simple. That isn’t glamorous advice, but it saves people from building a four-tap shrine they don’t really want to keep up.
Fast maintenance checklist
- Clean beer lines every two weeks
- Disassemble and clean faucets on the same schedule
- Inspect keg post seals, coupler seals, and hose clamps
- Wipe spills fast so mold and sticky residue don’t build up
- Check the CO2 tank level before a full keg goes flat on you
Readers who hit this section and think, “eh, I probably won’t do all that,” are not wrong to rethink the project. Better to know that now than after the novelty wears off.
Decide when a keezer or ready-made kegerator is the smarter move
Sometimes the best DIY move is not doing the fiddly version.
If you want one or two taps, normal fridge access, and a build that doesn’t ask much from your back, an upright fridge conversion is usually the sweet spot. If you want more capacity, more faucet options, and easier collar mounting, a keezer starts to look less like a detour and more like the clean answer.
A ready-made unit wins in a different way. It strips out the measuring, drilling, and layout risk. You pay for that, sure, but you also skip a pile of false starts and small hardware mistakes. For some readers, that is the sanest route. That earlier roundup of home kegerators is useful right here, right when the choice shifts from “can I build one?” to “should I build one?”
Here’s the blunt version:
- Build a fridge conversion if you want draft beer and a manageable project.
- Build a keezer if capacity matters more than easy loading.
- Buy a finished unit if the project part feels like the tax, not the fun.
The weird little trap with DIY kegerators is that people overbuild them. They aim for the final version in one shot. Three taps, manifold, fancy tower, tight mini fridge, everything crammed in there. A calmer first build usually works better. Then, if the draft bug really bites, you can go bigger without starting from confusion.
That is the part generic how-to guides usually skip. Not every build should be built.
FAQ
Can you build a kegerator from any mini fridge?
No. The fridge has to fit the keg and the fitting on top of it, not just the keg body. Compressor humps, fixed door shelves, and freezer plates inside mini fridges knock out a lot of candidates fast.
Is it better to keep the CO2 tank inside or outside the kegerator?
Outside is often nicer because it frees up cabinet space and keeps the regulator away from moisture. Inside is simpler if the cabinet is roomy enough. Either way, clamp the gas line well and leak-test every connection.
How long should a keg chill before you judge the pour?
Longer than most people think. The Brewers Association notes that a keg at 44 degrees Fahrenheit can need about 18 hours to get back to 38 degrees, and a keg at 50 degrees can need around 25 hours. Warm kegs create a lot of fake troubleshooting drama.
