You can set up a kegerator in an afternoon. The tricky part is not bolting on the tower or tightening the faucet. It’s getting the beer to pour like beer instead of a glass of foam with a sad half-inch of liquid hiding underneath.
So here’s the short answer to “how to set up a kegerator”: place the unit where it can breathe, assemble the tower and faucet, connect the beer line and gas line, attach the carbon dioxide regulator and coupler, chill the keg fully, start with sane pressure, then test for leaks and pour behavior before you call it finished.
That answer is correct. It’s also incomplete. A kegerator is a balance problem disguised as an assembly job. Temperature, pressure, coupler fit, and line resistance all have to agree. If one is off, the whole thing acts weird.
I’ve seen this play out the same way more than once. A new setup looks perfect. The gas is on. The coupler is locked. Then the first pour comes out angry and white. The natural reaction is to start twisting the regulator knob. Usually, that’s the wrong first move.
- What parts matter before you even start
- How to assemble the beer path and gas path without dumb mistakes
- What temperature and pressure to use first
- How to tell the difference between a warm keg and a bad setup
- What to check if the pour is foamy, flat, slow, or dead
- What to clean so the setup still works next week
Start Here: What to check first (simplified)
| If this is happening | Most likely cause | Check this first |
|---|---|---|
| All foam | Warm keg, warm tower, or too much pressure | Beer temp before PSI |
| No pour | Wrong coupler, gas off, or coupler not engaged | Coupler type and handle position |
| Flat beer | Low pressure or a gas leak | Tank connection and washers |
| Gas disappears too fast | Leak at the tank, regulator, or coupler | Hiss, seals, and connection points |
Fast rule: temperature first, coupler second, gas third, pressure last.
Why your kegerator can be fully assembled and still pour terrible
The common advice is not wrong. Install the tower. Hook up the lines. Set the regulator around 12 PSI. Tap the keg. Pour beer.
That gets you to “assembled.” It does not always get you to “working.”
The Brewers Association’s Draught Beer Quality Manual puts temperature right near the center of draft quality, and that matches what happens in home setups. A keg that is even a bit warm can throw foam. A warm faucet can mess up the first pour. A line that is too short or the wrong inner diameter can turn a good pressure setting into a lousy pour. So the hardware list matters, but the relationship between the parts matters more.
Think of it like tire pressure on a car. “32 PSI” sounds helpful until you find out you’re talking about a different vehicle, different tires, and a different load. Kegerators are like that. A number on its own is thin advice.
If you want the simplest version, use this framework: build the system in the right order, chill the beer fully, confirm the coupler fits the keg, then tune the pour one variable at a time. That last bit is where people lose patience. They start changing three things at once and then nothing makes sense anymore.
What to check before you assemble so you do not fight the wrong problem

Before you touch a clamp or a wrench, confirm what kind of setup you have. A factory-built direct draw kegerator is one thing. A converted fridge with a draft tower is another. Both can work well, but the second one usually needs a little more attention on temperature stability and line routing.
If the unit was moved on its side, let it stand upright before you power it on. Many setup guides use a 24-hour rest window after sideways transport, which is a safe, boring, sensible rule. It’s not glamorous advice, but compressors appreciate boring.
Then check the final location. Leave enough room for ventilation. Level the unit. Give yourself space to open the door and swap kegs without twisting the gas line into a knot. Small thing, big annoyance.
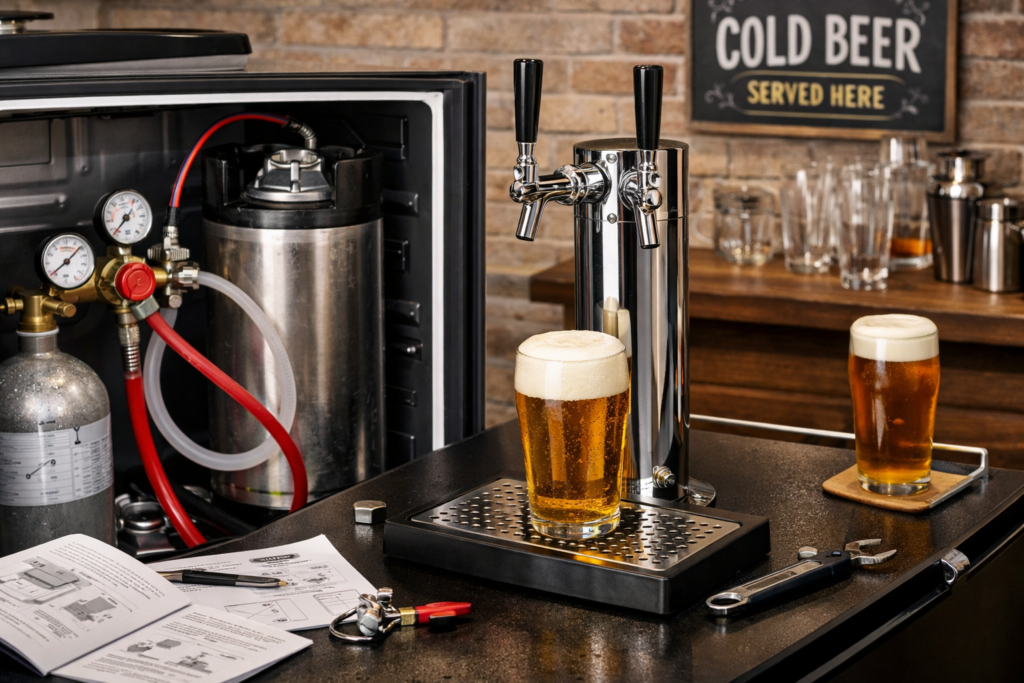
Next, lay out the actual parts:
- Draft tower
- Faucet and shank hardware
- Beer line
- Gas line
- Carbon dioxide regulator
- Carbon dioxide tank
- Keg coupler
- Washers and clamps
Then do the check that saves the most grief: match the coupler to the keg. In the U.S., a standard American Sankey D system coupler is common for domestic beers. Not universal. Just common. Guinness and some imports use different couplers. If the coupler is wrong, nothing downstream matters much. You’ll get no pour, poor gas flow, or a connection that almost fits and wastes your afternoon.
If the kegerator is a DIY conversion and the temperature control is a bit rough, a dedicated controller can clean that up. This guide on temperature controller setup fit is relevant if the draft fridge swings too warm or too cold.
Assemble the tower and faucet so the cold path stays sealed

Step 1. Feed the beer line through the tower so the beer path is clean and direct.
Run the beer line through the tower opening without kinking it. Kinks look harmless at first. Then they show up as strange resistance, slow pours, or intermittent foam. Not fun to diagnose later when everything is already tightened down.
Step 2. Seat the tower gasket so the seal is even.
Most kegerator towers sit on a gasket or washer at the mounting point. Seat that properly before tightening the tower. A crooked gasket can leave a gap. A gap means warm air where you don’t want it and a tower that sits just slightly off. That slight “eh, close enough” fit can come back as a nuisance leak or a warmer-than-expected first pour.
Step 3. Tighten the tower in a cross-pattern so it sits flat.
Don’t crank one side all the way down and then chase the other bolts. Tighten evenly. You’re trying to seat the tower, not bully it.
Step 4. Install the faucet with the correct washer so it doesn’t drip or bind.
The faucet should thread on cleanly. If it feels crooked, stop and back it off. Cross-threading faucet hardware is one of those mistakes that starts tiny and gets expensive. Use the proper faucet wrench, snug it down, and then leave it alone.
A warm tower can affect the first pour after the unit has been sitting. That’s not some mysterious curse. Beer in the tower warms faster than the keg in the cabinet. So if the first splash is a little lively and the second pour settles down, that tells you something useful: the keg may be fine.
Connect the beer line, gas line, and coupler in the order that prevents leaks

Step 1. Attach the beer line to the coupler so the liquid path is locked in.
The beer line usually runs from the tower to the liquid side of the coupler. On home direct-draw setups, 3/16-inch inner diameter beer line is common because it gives useful restriction in a short run. That detail matters later when you tune the pour.
Step 2. Attach the gas line to the regulator so pressure has a clean path.
The gas side is simpler than it looks. The carbon dioxide tank feeds the regulator. The regulator feeds the gas line. The gas line feeds the coupler. That coupler then pushes gas into the keg so beer can be driven out through the beer line.
Step 3. Connect the regulator to the tank with the right washer so gas stays in the system.
Metal-to-metal connections usually need the correct washer. Skip the washer and you’ll end up chasing a leak that feels bigger than it is. A lot of “my tank emptied crazy fast” stories start right here.
Step 4. Lock the coupler onto the keg only after the rest is secure.
Line up the coupler, twist it into place, then engage the handle. Different couplers vary a bit, but the general idea is the same: seated, twisted, engaged. If it feels forced, stop. A coupler should lock with intention, not desperation.
OSHA’s guidance on compressed gas cylinders is aimed at workplace handling, but one part applies neatly here: keep the cylinder upright and secured. Even in a home setup, that’s the sane way to store and use a carbon dioxide tank.
One more practical note. Gas hose is commonly 5/16-inch inner diameter. That’s normal. Don’t swap beer line and gas line just because the tubing in the box looks similar. It happens more than you’d think.
Chill the keg fully and set a sane starting pressure before you troubleshoot
This is the section that saves the most wasted time.
If the keg is not fully cold, don’t tune the regulator yet.
Micro Matic’s draft system guidance points to about 38 degrees Fahrenheit as a common target for direct-draw systems, with 12 to 15 pounds per square inch often used at sea level. That is a starting zone, not a magic number. The brewery’s recommendation comes first if it’s available because carbonation levels vary by beer style and producer.
The Brewers Association manual gives a very useful reality check on warm kegs: a keg at 44 degrees Fahrenheit can take about 18 hours to cool down to 38 degrees in a cold box. That’s why “it felt cold when I tapped it” doesn’t tell you much. The outside of the keg lies a little.
Here’s a clean starting rule:
- If the brewery gives serving pressure guidance, start there.
- If not, chill the keg to around 38 degrees Fahrenheit and start around 12 to 14 PSI for a short direct-draw home setup at sea level.
- If you’re at higher elevation, you often need more pressure. Micro Matic notes about 1 extra PSI per 2,000 feet of elevation as a guide.
And here’s the part people skip: let the keg settle and cool fully before deciding the setup is broken. A jostled keg and a warm keg produce lousy evidence. You’ll read the system wrong.
I tend to store kegs upright, cold, and untouched for a good stretch before tapping. That one habit eliminates a bunch of phantom problems. Not all of them. A bunch of them.
Balance the system so your pour is not all foam or oddly flat
A kegerator works best when the pressure pushing the beer and the resistance slowing it down are in the same neighborhood. That’s “balance.” It sounds technical, but the basic idea is simple. You’re trying to stop the beer from blasting out of the faucet while still keeping enough pressure on the keg to hold carbonation.
Micro Matic’s direct draw draft guidance breaks this into pressure, line restriction, and hardware restriction. It also notes that a direct-draw system often aims for flow around 128 ounces per minute and that some tower shank assemblies add about 3 PSI of restriction. That’s a useful reminder that the faucet side of the system is doing work too, not just the line.
For many home kegerators, 3/16-inch beer line is part of the balancing act because it adds more restriction than a wider line. If the beer is cold and the pressure is in a reasonable range but the faucet still spits beer like a fire hose, line resistance becomes a suspect.
Here’s the decision logic that actually helps:
- If the beer is cold and the pour is still violently fast, look at line restriction and applied pressure.
- If the beer is cold and the pour is slow and lifeless, look for low pressure, a partial blockage, or a gas delivery issue.
- If one beer behaves and another doesn’t, the carbonation level may be different enough that the same regulator setting is not ideal.
This is why “just set it to 12 PSI” falls apart so often. It’s a decent first guess. That’s all.
Change one thing at a time. Seriously. Pressure, then pour. Temperature, then wait. Line change, then retest. If you change three things and the beer improves, you learn nothing. You just got lucky.
Fast balance check
- Cold keg, normal pressure, wild foam: suspect line restriction or a warm faucet/tower.
- Cold keg, low pressure, flat taste: suspect under-pressure or a gas leak.
- Good first setup, bad after a keg swap: suspect coupler fit, seal wear, or the new keg’s carbonation level.
Test for leaks and pour once before you call the setup finished

Step 1. Open the gas and listen for the obvious.
This sounds too basic, but it works. A steady hiss is not subtle. If you hear one, start at the tank and regulator connection, then move to clamps, then coupler connections.
Step 2. Watch the regulator so the pressure reading stays stable.
A drifting reading, a tank that seems to fade too fast, or a setup that worked yesterday and is dead today all point back toward a leak. Not always. Often enough that it’s the smart place to look.
Step 3. Inspect the washer points because small seals cause big headaches.
The regulator-to-tank connection, coupler seals, and line clamps deserve a second look. A missing or worn washer can make the whole system act flaky. One little ring of rubber can wreck the vibe, honestly.
Step 4. Pull one controlled pour and judge the second, not just the first.
If the system has been idle and the tower warmed up, the first ounce or two can come out foamy. The second pour tells you more. You want a steady stream, not a violent rush, and not a dribble.
What counts as “finished”? No hiss. Stable gas delivery. Coupler engaged properly. Beer pours without runaway foam. That’s enough. You don’t need some ceremonial final step.
Fix the first bad pour fast with a symptom-by-symptom checklist
Most readers do not search for “balanced draft system.” They search for “why is my kegerator pouring foam” or “keg not pouring.” Fair. That’s how the problem shows up in real life.
If this, check that
| Symptom | Most likely cause | What to do next |
|---|---|---|
| All foam | Warm keg, warm faucet, too much pressure, worn coupler seal | Check beer temp, let keg settle, inspect seal, then revisit PSI |
| Slow pour | Low pressure, blockage, kinked beer line | Inspect line, clear obstruction, verify gas flow |
| No pour | Wrong coupler, gas off, coupler not locked, empty tank | Confirm coupler type, tank level, and engagement |
| Flat beer | Low pressure or leak | Check gas side and hold pressure steady |
| Tank empties too fast | Leak at regulator, line, or coupler | Inspect washers, clamps, and threaded connections |
If the kegerator is pouring all foam, temperature is the first check. Not the regulator. If the beer in the keg is above serving temperature, the carbon dioxide wants out of the beer fast. That’s foam. Then check whether the faucet and tower have warmed up. Then check pressure.
If there’s no pour at all, coupler mismatch is near the top of the list. I would check that before getting cute with anything else. A wrong coupler gives you a dead system no matter how clean the rest of the installation looks.
If the beer tastes flat, look for a leak or too little applied pressure. Flat beer is often quieter than foam, but it’s the same basic story: the keg is not seeing the conditions it needs.
If you’re running a converted draft fridge and the temperature swings, this is where a control setup helps the most. A stable serving environment fixes a lot of “mystery” foam. This piece on keeping a DIY draft setup at stable temperature is the most relevant supporting read from the site.
Clean the lines, faucet, and coupler so the setup keeps working next week
A kegerator that poured beautifully on day one can taste rough a week later if the lines are dirty. That’s not some fussy enthusiast thing. It’s basic draft hygiene.
Micro Matic’s maintenance guidance recommends cleaning beer lines at least every 14 days. That’s a good baseline for home draft care too. The same guidance also points out that acid cleaning is used periodically in some systems to deal with beer stone. Home users do not need to turn maintenance into a science project, but they do need a rhythm.
Here’s the practical version:
- Clean beer lines on a regular schedule, not when the beer starts tasting odd.
- Disassemble and clean the faucet now and then because sticky residue builds faster than you’d think.
- Rinse and inspect the coupler between kegs.
- Replace worn washers instead of pretending they still look “basically fine.”
Dirty lines don’t always scream “dirty lines.” They can show up as odd flavor, inconsistent pours, sticky faucet action, and foam that seems to have no obvious cause. That’s why maintenance belongs in setup advice. It changes how the system performs, not just how the beer tastes.
If the faucet starts sticking after sitting, don’t ignore that. A sticky faucet is a future problem announcing itself early.
FAQ
How long should a keg sit in the kegerator before tapping it?
If the keg was moved, let it settle upright and get fully cold before tapping. A useful benchmark from the Brewers Association is that a keg at 44 degrees Fahrenheit can take about 18 hours to cool to 38 degrees. So “overnight” is often the right answer for a freshly moved keg.
What PSI should I start with on a home kegerator?
For many short direct-draw home setups, starting around 12 to 14 PSI at about 38 degrees Fahrenheit is a sensible first setting at sea level. If the brewery gives a serving recommendation, use that first. If you live at higher elevation, add pressure gradually rather than guessing big.
Why is my kegerator pouring foam even though everything is connected correctly?
Because “connected correctly” and “balanced correctly” are different things. The usual causes are a warm keg, a warm faucet or tower after idle time, too much pressure for the setup, or a worn seal at the coupler. Check temperature first, then coupler fit and seals, then pressure.
