The first bad kombucha vessel I used looked perfect on the counter. Big glass body, cute little spigot, the sort of thing that makes you think, “Done. Problem solved.” Three batches later I was crouched over the sink, trying to scrub tea sediment out of a narrow opening while wondering whether the cheap metal tap was part of the reason the flavor kept coming out weird.
If you are choosing a fermentation vessel for kombucha, the best default for most home brewers is still a wide-mouth, food-grade glass jar in the 1-gallon range with a breathable cover. That is the straight answer. But it is only half the answer, because batch size, breakage risk, cleaning access, and whether you want batch brew or continuous brew can change the right call fast.
The tension here is simple: the internet keeps repeating “just use glass,” and that is mostly right, but it skips the part that makes the advice useful. A vessel is not just a material. It is a workflow. If the mouth is too narrow, the spigot is sketchy, or the setup nudges you into the wrong brewing method, the jar becomes the problem.
- Which vessel material is a safe yes, a conditional yes, and a quiet no
- Why wide-mouth beats pretty almost every time
- When stainless steel makes more sense than glass
- How batch brew and continuous brew change what you should buy
- The weak points people miss, especially spigots, lids, and fake “fermentation” features
- A fast buying checklist so you can pick a jar and move on
Fast pick
| If this sounds like you | Start here | Why |
|---|---|---|
| First batch, one or two people drinking it | 1-gallon wide-mouth glass jar | Easy to clean, easy to inspect, hard to outgrow right away |
| Large household or you hate lifting heavy glass | Food-grade stainless steel vessel | Less breakage risk and better fit for larger volume |
| You want continuous brew on the counter | Purpose-built glass or stainless vessel with a verified food-safe spigot | The vessel matters less than the hardware and cleaning access |
Named examples later in the article are there to make the criteria concrete. They are not lab-tested rankings, and no random accessory gets a pass just because the jar itself is glass.
The short answer: use a wide-mouth glass vessel unless your setup gives you a real reason not to
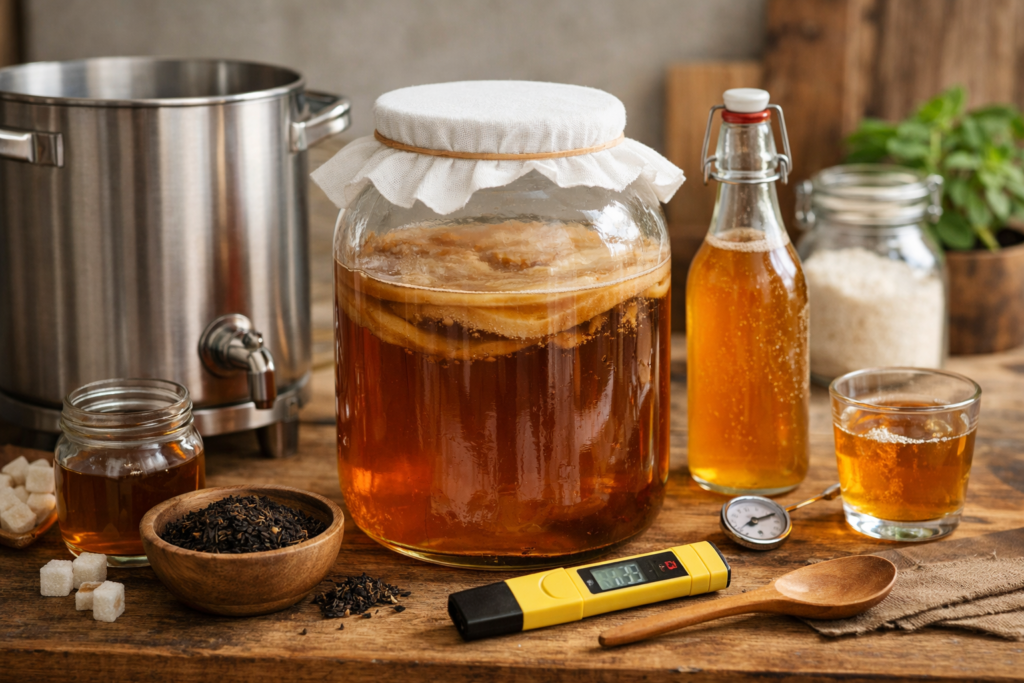
For most people, a plain wide-mouth glass jar wins because it does the boring stuff right. You can see the brew. You can reach inside to clean it. You can lift the SCOBY and starter tea without turning the whole job into a juggling act. And when something looks off, glass gives you a clear read instead of guesswork.
That last part matters more than people think.
Colorado State University’s kombucha food safety guidance lays out two points that shape vessel choice in a practical way. First, kombucha first fermentation uses a breathable cover, not a sealed setup. Second, the brew should acidify to pH 4.2 or below within about 7 days. A simple glass jar makes both of those easier to manage. You can cover it properly, watch what is going on, and sample without wrestling with the container.
A 1-gallon wide-mouth jar is the sweet spot for beginners because it gives you enough finished kombucha to make the process feel worth it, while still staying easy to move, rinse, and store. Smaller jars work for testing. Bigger jars work if you already know the routine and drink a lot. But 1 gallon is where most people stop overthinking and start brewing.
Remember: “Best” is not the prettiest vessel and it is not the one sold with the most accessories. It is the one that stays non-reactive, stays easy to clean, and fits the way you actually brew.
If you want a named example of the safe, plain-vanilla route, the North Mountain Supply 1-Gallon Wide-Mouth Glass Jar fits the template well. If you already own an Anchor Hocking Heritage Hill 1-Gallon Jar, that can work too for batch brewing, but only if you use a breathable cover during first fermentation instead of sealing it with the lid.
Glass, stainless, ceramic, or plastic? Pick the material by tradeoff, not folklore

The material conversation gets mangled because people flatten everything into one rule: “glass good, metal bad.” Reality is cleaner than that. Some metals are a bad idea. Food-grade stainless steel is not in that camp. Some ceramic is fine. Some ceramic is a hard no. Plastic can be food-safe in some contexts, yet it is still a weak first choice for kombucha.
| Material | Where it works | Where it goes wrong | Verdict |
|---|---|---|---|
| Glass | Batch brew, most home setups, easy monitoring | Heavy, breakable, some dispensers have poor spigots | Best overall default |
| Food-grade stainless steel | Large batches, lower breakage risk, long-term heavy use | You cannot see the brew, and cheap listings get vague about grade | Strong second choice, sometimes the better one |
| Ceramic or stoneware | Only when clearly food-safe and lead-free | Unknown glaze, decorative pottery, hidden contamination risk | Conditional yes |
| Plastic | Short-term handling or non-brewing tasks | Scratches, odor retention, weaker trust when better options exist | Skip for primary fermentation if you can |
Glass stays the top recommendation because it is non-reactive, visible, and easy to verify. You do not need marketing language to trust a plain glass jar. You just need it to be food-grade and shaped for the job.
Food-grade stainless steel gets lumped in with “metal” way too often. That is a mistake. The Nickel Institute’s food safety overview explains why stainless is so common in food equipment: it is durable, hygienic, and easy to clean. That lines up with real brewing use. If you are scaling up, tired of heavy glass, or brewing in a busy kitchen where breakage feels one dropped vessel away, stainless can be the smarter move. Look for clear food-contact language and a stated grade such as 304 or 316. If the listing dances around the material, move on.
Ceramic is the one that tempts people into bad decisions because it looks artisanal and “fermentation-ish.” The Food and Drug Administration warns that some traditional and decorative pottery can leach lead, which makes unlabeled crocks and mystery-glazed vessels a no. If the maker cannot tell you the glaze is food-safe and lead-free, that is the answer.
Plastic is where advice gets slippery. Some food-safe plastics are used around fermentation. Fine. But for a kombucha vessel, plastic is still a weak pick when glass is cheap and stainless is proven. It scratches, it gets cloudy, and it leaves you wondering whether “technically okay” is good enough for an acidic brew you plan to keep repeating in the same container.
Three named examples that fit the rules
- North Mountain Supply 1-Gallon Wide-Mouth Glass Jar: good for straightforward batch brewing.
- Mortier Pilon 5L Kombucha Brewing Jar: better fit for purpose-built continuous brew than a random party dispenser.
- Anchor Hocking Heritage Hill 1-Gallon Jar: workable if you use a cloth cover for first fermentation instead of the lid.
Choose the shape and size that makes brewing easier, not just prettier

Shape is where a lot of nice-looking vessels fail. People shop by silhouette, then discover the opening is too small to get a hand inside or to lift out a big floppy SCOBY without turning it into a wet card trick. At that point the vessel is not charming. It is annoying.
A wide mouth is not a luxury. It is the whole job being easier. You want enough room to clean the bottom properly, enough room to remove or check the culture, and enough room to pour fresh sweet tea without splashing sticky liquid down the side every single batch. Narrow-mouth jars, growlers, and many decorative drink dispensers lose on that alone.
Surface area matters too. Wider vessels often ferment a bit faster than tall narrow ones because more liquid is exposed to air at the top. That does not mean you need to calculate geometry like you are building a bridge. It just means a squat, open 1-gallon kombucha brewing jar usually behaves better than a tall thin container holding the same volume.
Size is easier:
- Quart size: okay for experiments, not great if you want enough finished kombucha to drink and still reserve starter tea.
- 1 gallon: best for most homes.
- 2 gallons and up: good when the household drinks a lot, or when you have already settled into a routine.
The Anchor Hocking Heritage Hill jar is a good example of the “repurposed but usable” category because the body is broad and accessible. The North Mountain Supply jar leans even more into function, which honestly is what you want at the beginning. Pretty is nice. Reachable is better.
Pro tip: If you cannot comfortably fit your hand inside the vessel for cleaning, it is already on thin ice. A narrow opening is the kombucha version of buying hiking boots two sizes too small because they looked good in the box.
Decide batch brew or continuous brew before you buy the vessel

This part gets backwards all the time. People buy a vessel with a spigot, then convince themselves they want continuous brew because the jar already points in that direction.
Flip that around.
Batch brew is the better starting method for most people because it gives you clean checkpoints. You brew, taste, bottle, reset, and learn. If a batch runs too tart or too slow, the boundaries are obvious. You are not trying to diagnose a system that is always half in motion.
Continuous brew has real upsides. It can be convenient, it can reduce handling, and it can suit households that drink kombucha constantly. Colorado State’s kombucha guidance describes a common continuous-brew pattern where about 80 percent of the fermented tea is drawn off and the SCOBY plus starter remain in the vessel. That method works. But it raises the stakes on the vessel itself. The spigot has to be trustworthy, the jar has to stay clean, and the habit loop has to be tighter.
| Method | Best for | What you gain | What you trade away |
|---|---|---|---|
| Batch brew | Beginners, casual weekly brewers | Control, easier troubleshooting, simple cleaning | A bit more handling each cycle |
| Continuous brew | Frequent drinkers, stable routine, counter setup | Less reset work, easy draw-off | More dependence on vessel hardware and process discipline |
If you already know you want continuous brew, a purpose-built vessel like the Mortier Pilon 5L Kombucha Brewing Jar makes more sense than a generic beverage dispenser. The point is not the brand halo. It is the fact that a purpose-built jar usually treats the valve, height, and access as brewing features rather than party-service extras.
If you are new, though, batch brew in a wide-mouth glass jar is still the better teacher.
Audit the weak points before you trust any jar with a live batch

People stare at the vessel body and miss the parts that actually touch the brew, or the parts that make routine care harder than it needs to be.
Run this quick audit before you commit:
- Check the mouth. Wide enough for a hand, a cloth cover, and easy SCOBY handling.
- Check the spigot. If there is one, verify the material and make sure it can be cleaned without drama.
- Check the lid situation. First fermentation wants a breathable cover. A nice glass lid is not a substitute.
- Check the bottom shape. Hard-to-reach curves trap sediment and make cleanup fiddly.
- Check counter stability. Tall, top-heavy dispensers are fun right up until someone bumps them.
Breathable cover advice gets watered down online. It should not. Colorado State recommends a porous, tightly woven cover that keeps out insects while still allowing airflow. That means a cloth cover, paper towel, or coffee filter secured well. Loose cheesecloth is a weak choice because fruit flies can still find gaps. An airlock setup, which is common in other kinds of fermentation, is also not the default answer for kombucha first fermentation.
Then there is pH. Virginia Cooperative Extension’s kombucha guidance points out that monitoring pH helps confirm that the brew is acidifying as it should. That is why a vessel should make sampling easy, not awkward. If you are trying to diagnose slow fermentation, the right question is not just “Is this jar safe?” It is also “Can I work with it without making a mess or skipping the boring checks?”
Important: A sealed airlock jar can be a great tool for some ferments. Kombucha first fermentation is different. It wants airflow plus protection from bugs and dust, not a locked-down lid pretending the SCOBY does not need to breathe.
Match the vessel to your situation with these fast decision rules
You do not need a giant buyer’s guide. You need a few clean rules that match the way you brew.
If this is the first batch: get a 1-gallon wide-mouth glass jar. No spigot needed. Keep it simple and learn what normal fermentation tastes and looks like.
If the kitchen is busy or glass makes you nervous: move stainless steel higher on the list. A vessel you are comfortable handling is better than a “perfect” glass jar you hate moving.
If the household drinks kombucha fast: think about larger volume or continuous brew, but only if the setup stays easy to clean. More tea is not helpful if the vessel becomes gross or lazy-maintained.
If the main complaint is slow fermentation: check room temperature before changing jars. A cool room will drag the process more than a slightly imperfect vessel shape. When temperature is the real bottleneck, best heating pad for fermentation is the more relevant next read than another jar roundup.
If you want a neat countertop setup: that is where purpose-built continuous brew vessels earn their keep. Just do not confuse neat with safe. The valve and opening still matter more than the silhouette.
If you are dialing in a more controlled setup: a jar change will only take you so far. For tighter temperature control, temp controllers for brewing is the better toolset to look at.
Note: Many people blame a jar for “slow kombucha” when the real issue is a cold corner of the kitchen. Vessel shape can nudge fermentation. Temperature can shove it.
Avoid the mistakes that make people blame the SCOBY when the vessel was the problem
Using decorative ceramic with unknown glaze. This one feels earthy and old-school, which is why it traps people. If the pottery is not clearly food-safe and lead-free, it is out. No romance points.
Buying a narrow-mouth jar. You can brew in it, sure. You can also spend every cleaning session muttering at it. Narrow openings turn normal maintenance into avoidable friction, and friction is what makes home fermentation habits fall apart.
Trusting unknown spigots. A lot of drink dispensers are designed to hold lemonade for an afternoon, not acidic kombucha for repeated use. The body can be glass and still be let down by bad hardware.
Using loose cheesecloth. Breathable does not mean wide open. Fruit flies love half-baked covers.
Confusing second-fermentation bottles with first-fermentation vessels. Pressure-safe flip-top bottles belong in second fermentation. They are not substitutes for the main kombucha vessel.
Buying a general fermentation kit and assuming it suits kombucha. Airlocks, narrow jar mouths, and kit-friendly accessories can make sense for other ferments. Kombucha has its own pattern, and the vessel should match that pattern.
Ignoring pH and temperature when a batch stalls. If a brew is lagging, do not jump straight to “bad SCOBY.” Check the room, check the acidity trend, and then judge the culture.
The thread through all of these mistakes is the same. The vessel fails quietly. Nothing explodes. Nothing dramatic happens. It just becomes a little harder to clean, a little harder to trust, and a little easier to use badly.
Use this simple buying criteria box to pick the right kombucha vessel in 60 seconds
Quick buying checklist
- Material: glass first, food-grade stainless if you have a clear reason to switch
- Mouth: wide enough for your hand and easy SCOBY handling
- Size: 1 gallon for most beginners, larger only when the routine already fits
- Cover: breathable, secure, and boring
- Spigot: only if you actually want continuous brew, and only if the material is trustworthy
- Cleaning: if the shape makes you sigh before you start, skip it
- Stability: steady on the counter, not tall and tippy
If you only remember one rule when shopping for a fermentation vessel for kombucha, make it this: buy the vessel you will keep clean and use consistently. Not the one that looks the most “kombucha.” Not the one with the most accessories. The one that fits the rhythm of the brew and does not add friction.
For beginners, that is a wide-mouth 1-gallon glass jar almost every time. For bigger-volume brewers or glass-averse households, food-grade stainless steel has a real case. For continuous brew, the spigot and cleaning design deserve more attention than the material headline.
That is the whole game, really. Pick the vessel that makes good habits easier.
FAQ
Can I use a metal lid if it does not touch the kombucha?
If the lid is just sitting above a cloth cover or not contacting the brew at all, it is usually a non-issue. The safer move for first fermentation is still a breathable cover secured directly over the opening, with any decorative lid left off.
Do I need a spigot for kombucha?
No. For batch brewing, a spigot often adds more variables than value. It becomes useful when you already know you want continuous brew and you trust the valve material and cleaning access.
Can I use an airlock jar for kombucha first fermentation?
It is not the standard setup. Kombucha first fermentation uses a breathable cover rather than a sealed airlock. Airlocks make more sense for other ferments than they do here.
